


- 17 March 2021
Build a deck
Building a great deck is easy
A well-designed deck is a relatively easy way to increase family living space around your home. It's like adding on an outdoor room that can be a perfect link for relaxed indoor/outdoor living. It will also add value to your home. If you wish, you can even cover your deck by adding a pergola as you build it.
Materials Checklist
TIMBER
- Stumps: Red Gum, Jarrah, Cypress Pine or Treated Pine 100 x 100mm
- Sole Red Gum or Jarrah Plates: 250 x 250 x 50mm
- Bearers: Unseasoned Hardwood 100 x 75mm or Treated Radiata Pine 100mm x 100mm
- Joists: Unseasoned Hardwood or Treated Radiata Pine 100 x 50mm
- Decking: Merbau, Batu, Jarrah, 70 x 19mm or Treated Radiata Pine 70 x 22mm
FIXINGS
- Nails: 50 x 2.80mm TitaDeck® galvanised decking nails 75 x 3.75 galvanised bullet head 100 x 3.75mm galvanised bullet head
- Masonry Anchors (Dynabolts)
- Cement Mix
- Sole Plates: 250 x 200 x 50 Red Gum
- Ant Caps
- Decking stain if required
Building a great deck is easy
When choosing the site for your deck, note the position of the existing features of both your house and garden. Pay special attention to the location of drains and any external plumbing, because once your deck has been built, it will be hard to access the area under it. Take ground preparation and drainage into account by laying some Agi Pipe or Nylex Strip Drain before you start building to avoid any surface water lying about underneath. Just follow the maker’s instructions. Then rake the ground clear. It might be a good idea to add Weed Control Mat at this stage, too.
Step 2: Mark out your site
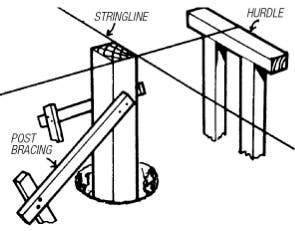
Accuracy at this stage can save a lot of hassles later on so take your time and don’t rush. Mark out the width and length of the deck where it will join the house. Then, using any scrap timber, build corner hurdles and drive them into the ground, outside the designated area, two at each corner. Fix nails in the hurdle top pieces and stretch a string line around them to form a box in the plan’s dimensions. Lines I and I should be parallel and the distance between them equal, as should lines 2 and 2. Measure between the diagonally opposite corners with a tape measure to ensure that lines 3 and 3 are the same length. You may have to adjust the position of the nails to achieve this. Once the diagonal measurements are equal and all lines are parallel, the job will be square and you are ready to set the stumps.
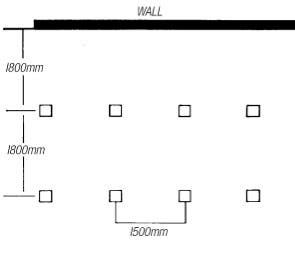
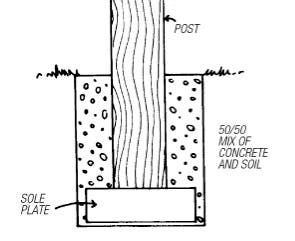
Step 3: Set the stumps
Space your stump holes every 1800mm out from the house and 1500mm apart. Dig the holes 300 x 300mm square and 600mm deep. Dig them so that when the stumps are centred in them, the outside edges of the stumps are flush with the string line. Before setting the stumps in the holes, place a timber soleplate in the bottom of each hole. Stand the stump on the soleplate. You may need to brace the stump temporarily so it stays upright and straight . Fill the hole completely with a 50/50 mixture of soil and dry cement. Check the stump with your spirit level and adjust the braces if necessary to hold it square in place, then firm the mixture by tamping down hard. Use your string line to make sure all stumps are in line with each other and check for plumpness with your level. Add water to set the cement in the soil mixture. Finally, fit ant caps to the top of the stumps.
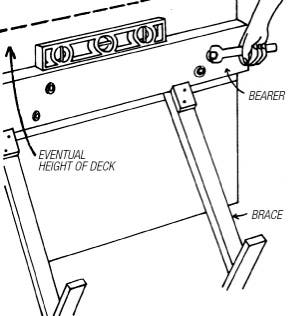
Step 4: Add the framing
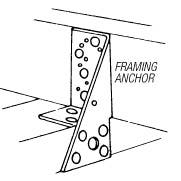
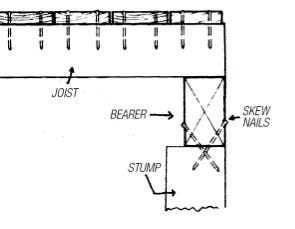
If your house is weatherboard, ideally bearers should be joined to the existing bearers of your house. If your house is brick then you can connect a 150 x 150mm bearer to the brick with suitable masonry bolts at 600mm intervals. Drill holes in the bearer before attaching it to the wall. Hold the bearer in position below the string line allowing for the combined thickness of the decking and joist and drill and fix the bearer into position with masonry anchors of correct size to suit thickness of the timber bearer. The anchors should be in 600mm spacings. Skew nail (driving nails in at an angle –remaining bearers onto stumps. Or use nail plates or framing anchors . Check all levels and angles once again. Set joists on top of bearers every 450 – 600mm for hardwood decking, every 400mm for pine decking using the skew nail technique or galvanised framing anchors.
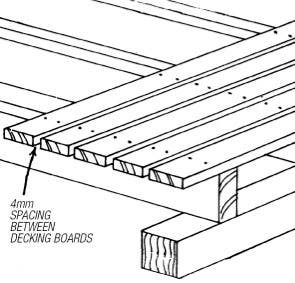
Step 5: Lay your decking surface
The decking surface will be the most visible part of your work, so take your time and check your progress as you go. Each decking board should be square to the others and, together, be square to the house. While decking boards are dressed, the odd one or two may be bowed and care should be taken that the bow is eased out as you nail them in place. Nail the boards to the joists using two galvanised decking nails at each point, placed approximately 15mm in from the edge of the board. Leave a gap of about 4mm between each board to allow for drainage. You can use a piece of suitably sized timber as a spacer, placing it into position against the previous board ateach nail point and pulling the board against it as you nail. Drill each board end before nailing to avoid splitting. Make sure that joins in the boards are staggered and always occur over a joist. To get straight, even edge to the finished deck, let the ends overhang about 50mm, then trim them all together with a saw when you’ve completed laying all boards.
Step 6: Finishing your new deck
If you have chosen a hard durable decking surface such as Batu or Merbau, a decking finish is optional. Treated radiata pine decking already comes in a natural green colour and doesn’t normally require any added protection unless facing north or west. But remember, most timbers left to age naturally will turn to a silver-grey colour over a year or so from completion. So consider painting or staining carefully. If you require something that will enhance and maintain the beauty of the timber you’ve chosen, then there are a number of attractive finishes you can use from Cabots and Wattyl. Ask the paint staff at your local Mitre 10 store. Now, all that’s left to do is sit back and enjoy your new deck – and admire your own handiwork.
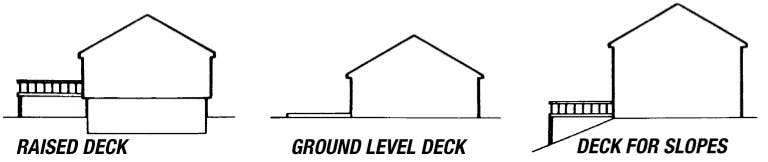
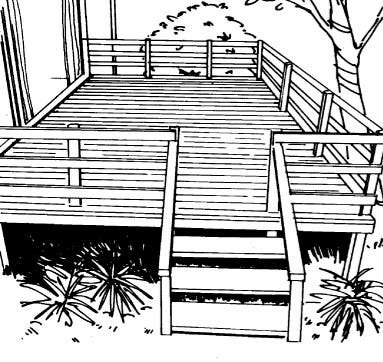
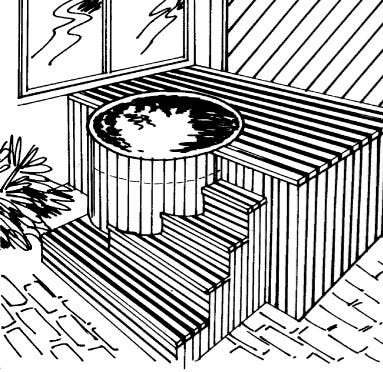
Deck designs
Building a timber deck in our own backyard is really a breeze. All decks are made in much the same way, so it’s easy to adapt the basic techniques to your own site and your own lifestyle. Here’s just a few examples to get you thinking – and designing your own.