


- 22 April 2024
How to Make a DIY Timber Bedhead
Are you looking to enhance the beauty of your bedroom? A stunning DIY timber bedhead can be the perfect addition to elevate your sleeping space. In this comprehensive guide, we'll take you through the process of creating a captivating bedhead, adding a personalised touch to your decor.
Materials & Tools List
Before you begin, gather the materials and tools required for this project. You'll need:
Tools
Materials list
-
2 pieces of 66 x 42 x 5400mm Primed Pine Balustrade Bottom Rails
-
2 pieces of 66 x 66 x 5400mm Primed Pine Posts
-
2 pieces of 18mm x 38 x 5400mm Pine Beading
-
1 piece of 110 x 18 x 5400mm Primed Pine
-
12 pieces of 144 x 600mm Pine Tongue and Groove Panels

Step 1: Measure and Cut the Timber


Start by measuring and cutting the timber according to the following dimensions:
- Leg Posts: 2 pieces measuring 66 x 66 x 1100mm
- Balustrade Bottom Rails: 2 pieces measuring 66 x 42 x 1520mm
- Beading: 2 pieces measuring 18 x 38 x 1520mm
- Top Piece: 1 piece measuring 110 x 18 x 1760mm
- Tongue-and-Groove Panels: 12 pieces measuring 144 x 600mm
Use a tape measure and pencil to mark the measurements accurately. Then, use a circular saw or suitable cutting tool to make clean cuts along the marked lines.
Step 2: Assemble the Leg Posts


Place the leg posts on a flat surface, ensuring they are parallel and the same height. Use wood glue and screws to attach the balustrade bottom rails to the leg posts, creating the base of the bedhead.
Step 3: Install the Tongue-and-Groove Panels


Position the tongue-and-groove panels vertically between the balustrade bottom rails. Apply wood glue along the edges of each panel and secure them in place using screws. Make sure the panels are evenly spaced and flush with the bedhead frame.
Step 4: Attach the Beading


Place the beading horizontally along the top and bottom edges of the tongue-and-groove panels. Apply wood glue along the edges and secure the beading using screws. Ensure the beading helps keep the panels in place and provides a finished look. Then, attach the second leg.
Step 5: Install the Top Piece

Position the top piece horizontally on the bedhead, ensuring it is centred and has equal overhang on both sides. Apply wood glue to the backside of the piece and secure it firmly with screws. Double-check the alignment and stability of the bedhead.Position the top piece horizontally on the bedhead, ensuring it is centred and has equal overhang on both sides. Apply wood glue to the backside of the piece and secure it firmly with screws. Double-check the alignment and stability of the bedhead.
Step 6: Sand, Paint, and Finish


Prepare the bedhead for painting by smoothing any rough surfaces. Fill gaps and mask any exposed screws with wood putty. Sand down rough surfaces with a sander or sandpaper.
Then, choose your preferred paint or stain colour and apply it evenly to the bedhead. Use a paintbrush or roller for larger surfaces and a smaller brush for intricate areas. Apply multiple coats if needed, allowing sufficient drying time between each coat.
Once the paint or stain has dried completely, inspect the bedhead for any touch-ups or additional finishings. Consider applying a clear topcoat to protect the timber and ensure longevity.
Step 7: Enjoy Your Stylish Bedhead
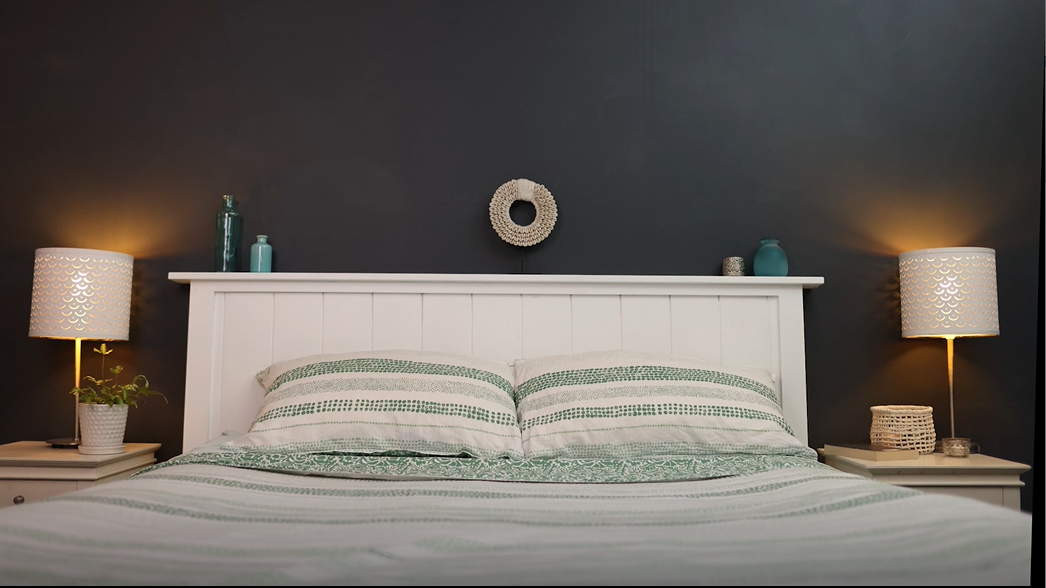
Congratulations! You have successfully created a stunning DIY timber bedhead. Step back and admire the transformation it brings to your bedroom. Enjoy the cosy and personalised atmosphere it adds to your sleeping space.
Remember, the journey doesn't end here. Let your creativity soar by exploring other DIY projects and personalising your home further.
For more Mighty Helpful service and advice, speak to the team at your local Mighty Helpful Mitre 10.


