- 16 September 2021
Enhance the food experience with a great table
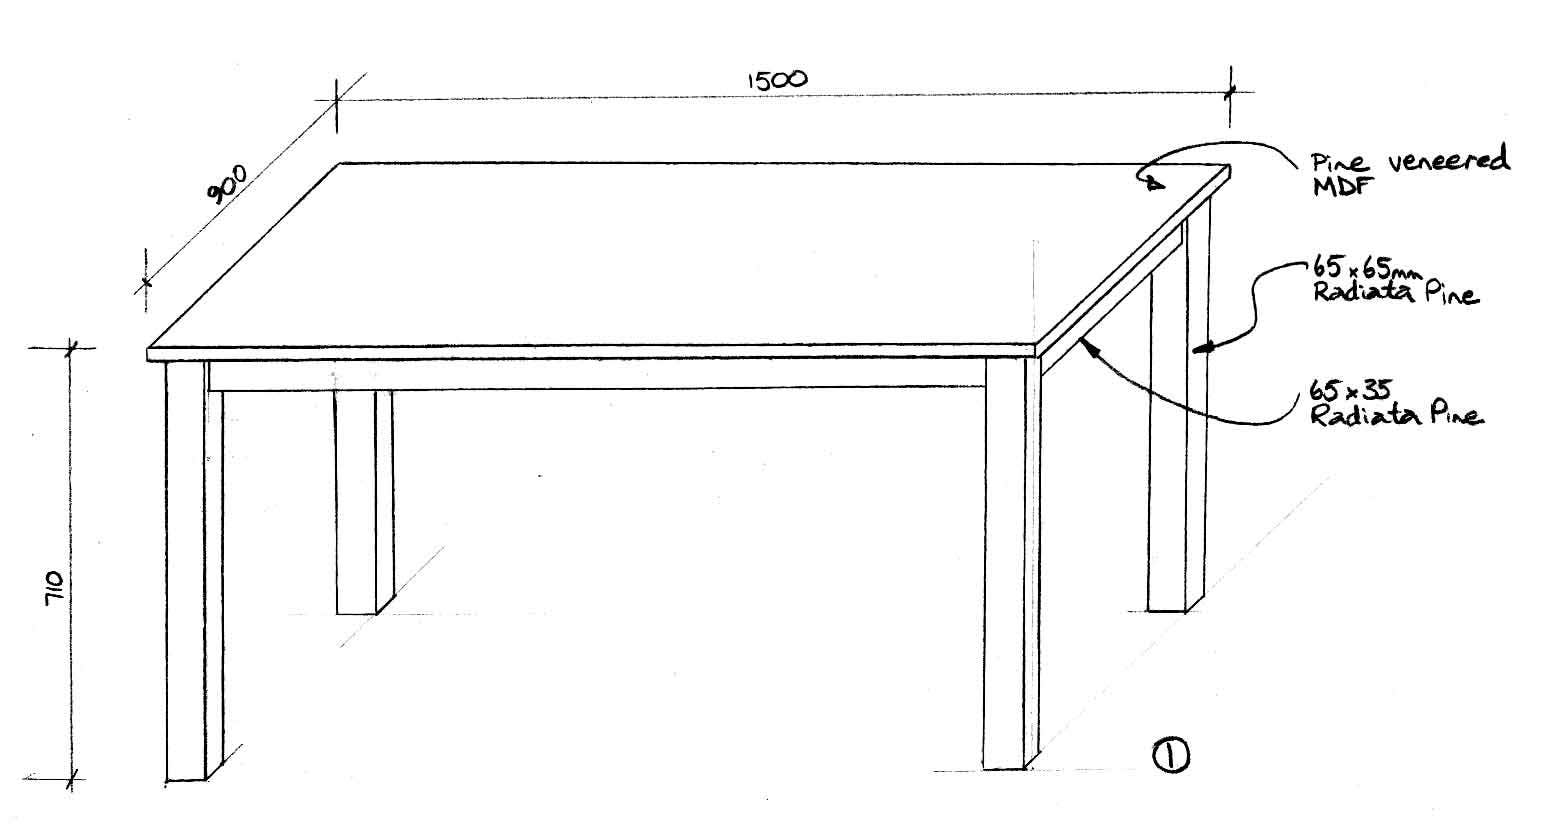
The great thing about making your own table is that you can create it to suit your own sense of style. Timber products are easy to work with and can be stained and finished in many ways. This MitrePlan shows the steps to make a very simple dining room table that can be customised in many ways. This plan shows how to make a 6-seat table (1500 x 900mm) or a 4-seat (900mm square) version. You can use readily available materials, or track down something more unusual to suit your taste or existing décor. We’ve chosen a radiata pine appearance, but you could use raw MDF or another veneer. The table can be stained, clear finished, lime washed, waxed, or painted. You can vary the dimensions to suit your needs as well.
Tools for the job
- Tape measure, try-square, pencil,
marking gauge (optional) - Circular saw, straight edge,
sacrificial timber and/or saw
horses - Mitresaw
- Drill / driver and 12mm and 5mm
brad-point bits - Dowelling jig
- Jigsaw
- Router and moulding bits
- Hand saw
- Claw hammer
- Sanding block
- Belt or random-orbit sander
- Putty knife
- 75mm paint brush (good quality),
rags and clean-up equipment
Step 1: Get ready
When you buy your materials at Mitre 10 ask about the cutting service (not available at every store). By having your parts cut to size at the store you can transport them easily and minimise dust and waste at home.
Step 2: Cut and prepare the pieces
Use a circular saw to cut the veneered MDF to size. Lay the sheet down on sacrificial lengths of 65 x 35mm pine, mark it to size, clamp a straight-edge guide to the sheet so that your saw will cut accurately and dead-straight. Check that the sheet is actually square already, and if there’s one good long and short edge you’ll only have to make two cuts. If all edges are damaged you’ll have to trim about 10mm off with your saw and straight-edge before marking and cutting to size. Cut the legs and rails to length with a mitre saw. Trim one end of each piece of timber square before measuring and cutting the parts. Every part should be straight, and have square ends.
Tabletop
You can leave the table top corners square, but if you have toddlers you can save their little heads from injury by rounding them. Trace around a soft drink can accurately on the corners, cut off with a jigsaw, and sand to produce a bump-free round corner. We selected MDF for the top because it doesn’t need to have a timber edge fitted to hide it. Although you can leave it square, it will look and feel better if it is moulded. There’s a wide range of router cutters available in many shapes that will look good on a tabletop. Select a cutter that has a guide wheel on the bottom, fit it in your router, set the depth and make the moulding in a well ventilated area (preferably outside). Use a sharp cutter and steady speed to avoid burn marks on the MDF edges. Push the router around the table in an anti-clockwise direction. If you use a sharp router cutter, and move the router at a steady speed you should not need to sand the edges except to remove sharp edges and the odd burn mark. Sand the top surface by hand with the grain with 280 grit sandpaper ready for it’s final finish.
Table frame
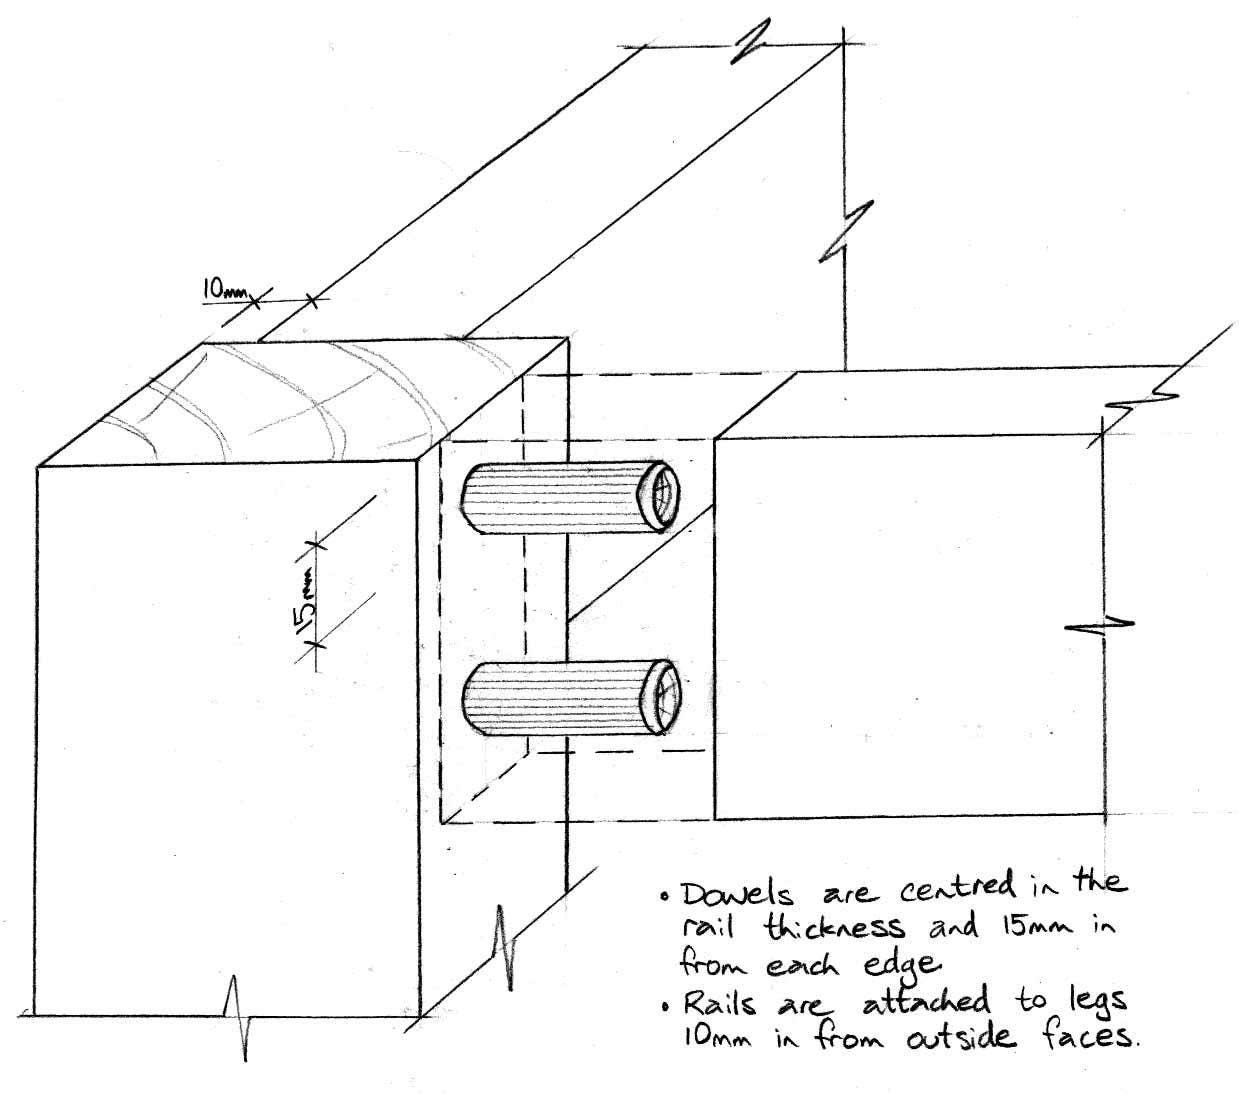
Mark the legs and rails for the dowel joints as shown in the diagram. Although you can bore these holes freehand, a dowel jig will keep your drill perfectly square and keep the drill from wandering off the mark (this is common in radiata pine because there’s a huge difference in hardness between the growth rings). Drill the holes to a depth of 32mm (half the length of the dowels plus space for trapped glue and air). Use a sharp hand plane to make a small (5mm) bevel on the bottom edges of the legs. This helps to prevent chipping and splitting when the table is dragged along a floor. Sand the face and bottom edge of each rail, and sand the legs on all sides with 120 grit sandpaper. A belt sander is ideal as it will sand with the grain. Finish with 280 grit sandpaper and a sanding cork.
Step 3: Assembly
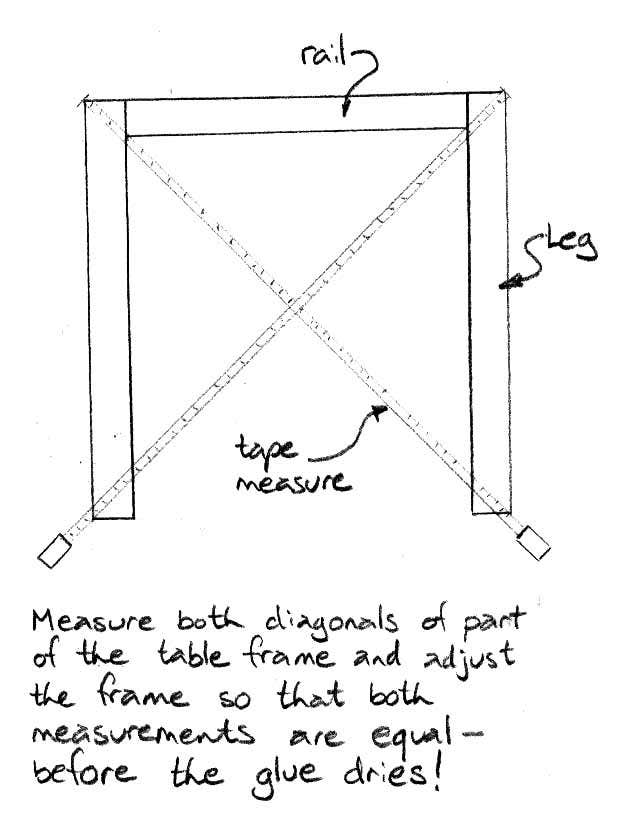
Assemble the two end frames first (the short rails if you’re making a 6-seater). Lay the legs down on a clean flat surface (such as the offcuts from tabletop). Squirt PVA glue into all the holes and “swizzle” the glue to spread it fully in the hole. A bamboo skewer makes an ideal swizzle stick. Drive dowels into the holes until they just hit bottom – watch out for squirting glue! Squirt glue into the dowel holes in the rails, swizzle, and push the legs and rails together. If they’re tight, use a rubber mallet or hammer and block to drive them together. Tighten the joints with sash clamps if you have them, otherwise a ratchet tie strap will do the trick. Check the leg assemblies for square by measuring the diagonals. If they’re not equal, give the frame a little shove until it is. Lay the assemblies flat to make sure the legs are perfectly parallel with each other. When dry, assemble the two end frames with the long rails in the same way, checking to ensure that the frame is perfectly square, and leave it to dry. Glue blocks of 19mm square pine into all corners to strengthen all of the joints. These blocks provide a great deal of strength, and will help your table to survive moving, dragging, and even people sitting or standing on it. Make sure the surfaces are flat and clear of glue dags, then simply “rub” the blocks into place with plenty of PVA glue – there’s no need to screw or nail the blocks in place. Bore 5mm holes vertically through the rails and countersink the underside just enough to allow the screw heads to finish flush. Place the tabletop upside down on a soft blanket or pads, place the table frame on it and carefully centre it. Screw the table together – but make sure the screws will not penetrate the table top surface!
Step 4: Apply a finish
It’s best to apply your chosen finish before assembling the table completely, so that you can get an even finish on the table rails and the underside of the top is smooth to touch and protected from moisture. Give all the parts a final hand-sand with 280 grit abrasive paper, removing any pencil marks. Apply your chosen stain according to the manufacturer’s instructions and allow it to dry. Apply the first coat of clear polyurethane and allow it to dry. Now apply wood stop to any knot holes or other defects and allow it to dry fully. Use 280 grit abrasive paper to flush-off the wood stop and to sand the first coat of polyurethane. Apply a second coat of polyurethane and allow it to dry. If necessary, sand all parts again with 400 grit abrasive paper and apply a final coat of cleat polyurethane.
Step 5: Maintain your table
Water is the enemy of timber products, so when you clean your table use damp cloths (not wet) and use gentle liquid cleaning products for stubborn marks. Don’t place hot items directly on the surface, and beware of porous vases (such as unglazed terracotta) as these can cause severe moisture damage. Avoid using furniture polishes that contain silicone, or create build-ups. Silicone will create major problems if you ever want to refinish the table. Scratches can be filled with wax sticks in colours that match your table’s wood-grain.