- 10 March 2021
Building a great play centre is kid stuff
Here are four great ways to keep children happily occupied for hours in the safety of their own backyard. And building any of them is simple. They’re all made from treated pine logs for long life. And the design features a strong crossbeam and four legs rigidly held together with coach bolts and set in concreted holes. The attractive tyre swing, rope ladder and trapeze are all available from your Mitre 10 store.
Your Materials Checklist
ALL PLAY CENTRES
- 5 – 100-125 diameter x 3000mm Logs or 100mm Precision Logs – (2 End Frames and Cross Beam)
- 4 – 30kg Bags Concrete Mix (bag sizes may vary)
- 1 – Trapeze Bar and Ropes
- 1 – Tyre Swing and Ropes (or timber swing seat: 1 – 400 x 200 x 38mm Treated Pine Board
ADDITIONAL SWING CENTRE
- 6 – 275 x 10mm Coach Bolts, Nuts and Washers
- 4 – Pigtail Hooks
ADDITIONAL SWING'n'LADDER CENTRE
- 6 – 275 x 10mm Coach Bolts, Nuts and Washers
- 1 – Rope Ladder
- 6 – Pigtail Hooks
ADDITIONAL SWING'n'CLIMB CENTRE
- 3 – 75-100 diameter x 2400mm Logs for Climbing Rails – cut 6 x 1200mm long
- 3 – 150 x 25 x 2400mm Boards for floor – 6 required, cut to size
- 6 – 275 x 10mm Coach Bolts, Nuts and Washers
- 12 – 250 x 10mm Coach Bolts, Nuts and Washers
- 500g Pkt. 75 x 3.75mm Galvanised Bullet Head Nails
- 4 – Pigtail Hooks
SAND PIT
- 8 – 125-150mm diameter x 1800mm Logs
- 12 – 300 x 10mm Coach Bolts, Nuts and Washers
- 0.8 square metres Washed Sand
- 1800 x 1800mm wide Weed Mat
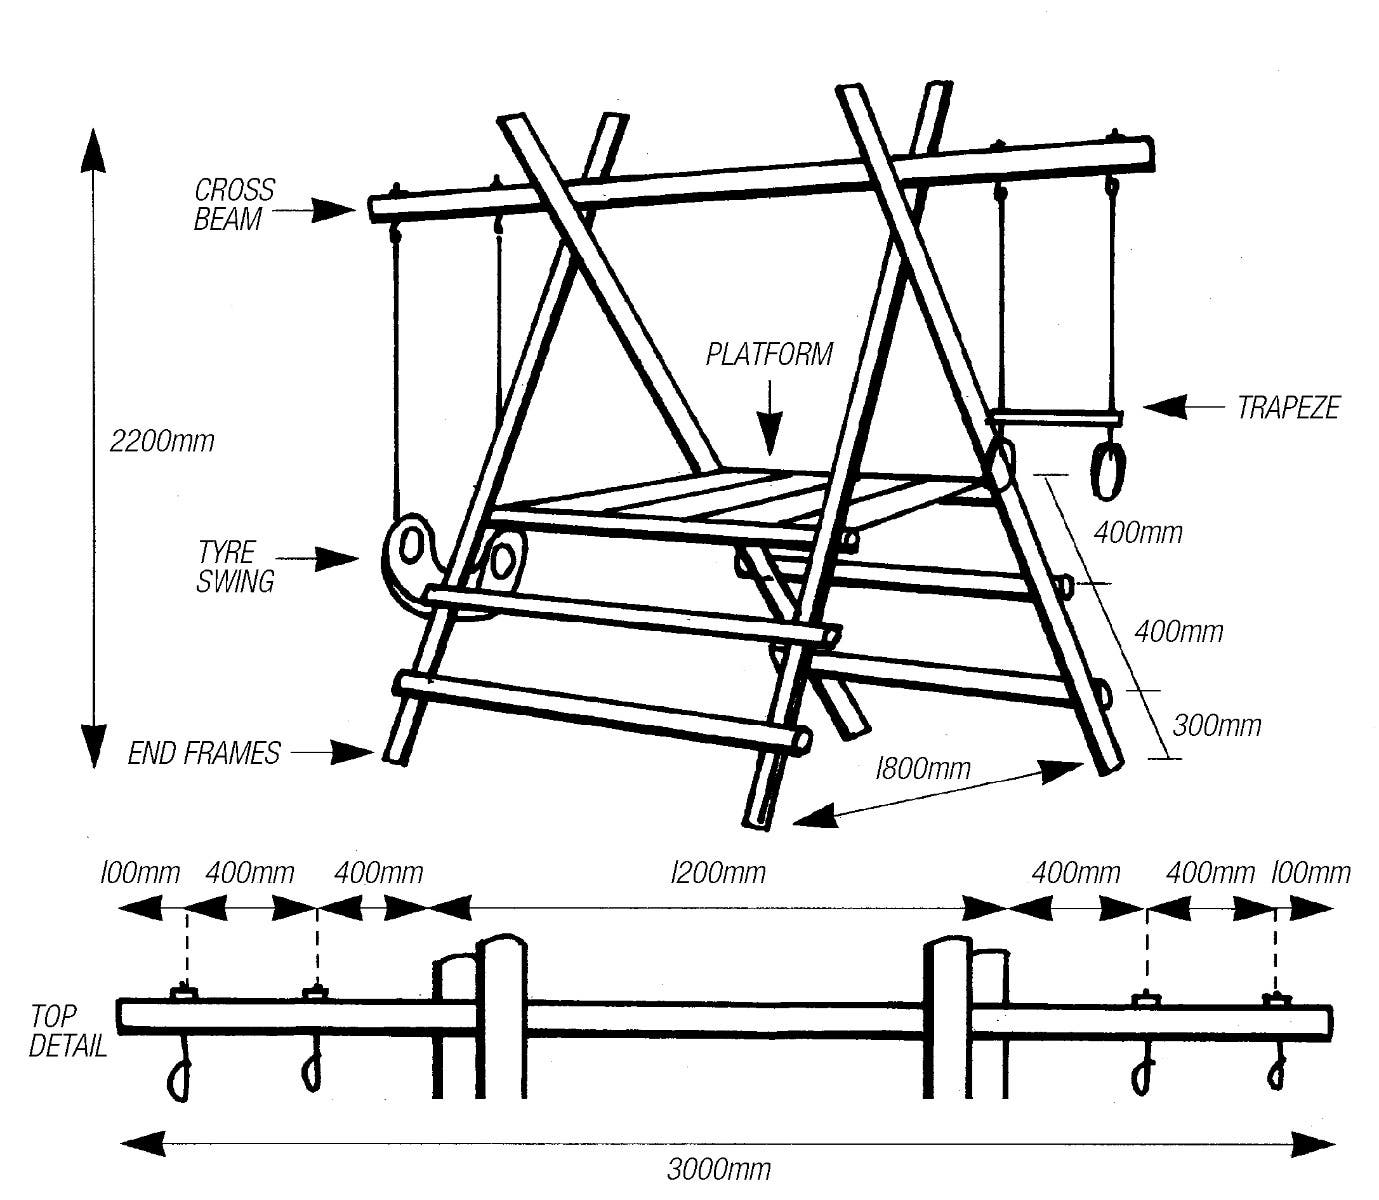
Step 1: Measure cross beam
The basic frame is constructed in the same way for all play centres. Start by selecting one of the 100-125 x 3000mm logs as the cross beam. Then, following the dimensions as shown for the play centre you have chosen to build (Fig 1, 2 or 3), measure and mark on the beam the exact locations of both end frames and the pigtail hooks that hold up the play equipment. Drill 12mm holes centrally through the beam for the pigtail hooks only. Ensure the holes you drill are straight by marking both sides of the log and drawing a line around it to act as a drilling guide. Fit the pigtail hooks to the beam and firmly tighten the nuts. Cut off the excess length of the bolt, then burr the thread above the nuts by hammering to prevent the nuts from coming loose. Then smooth over with a file to remove any sharp edges.
Fig. 1
Fig. 2
Fig. 3
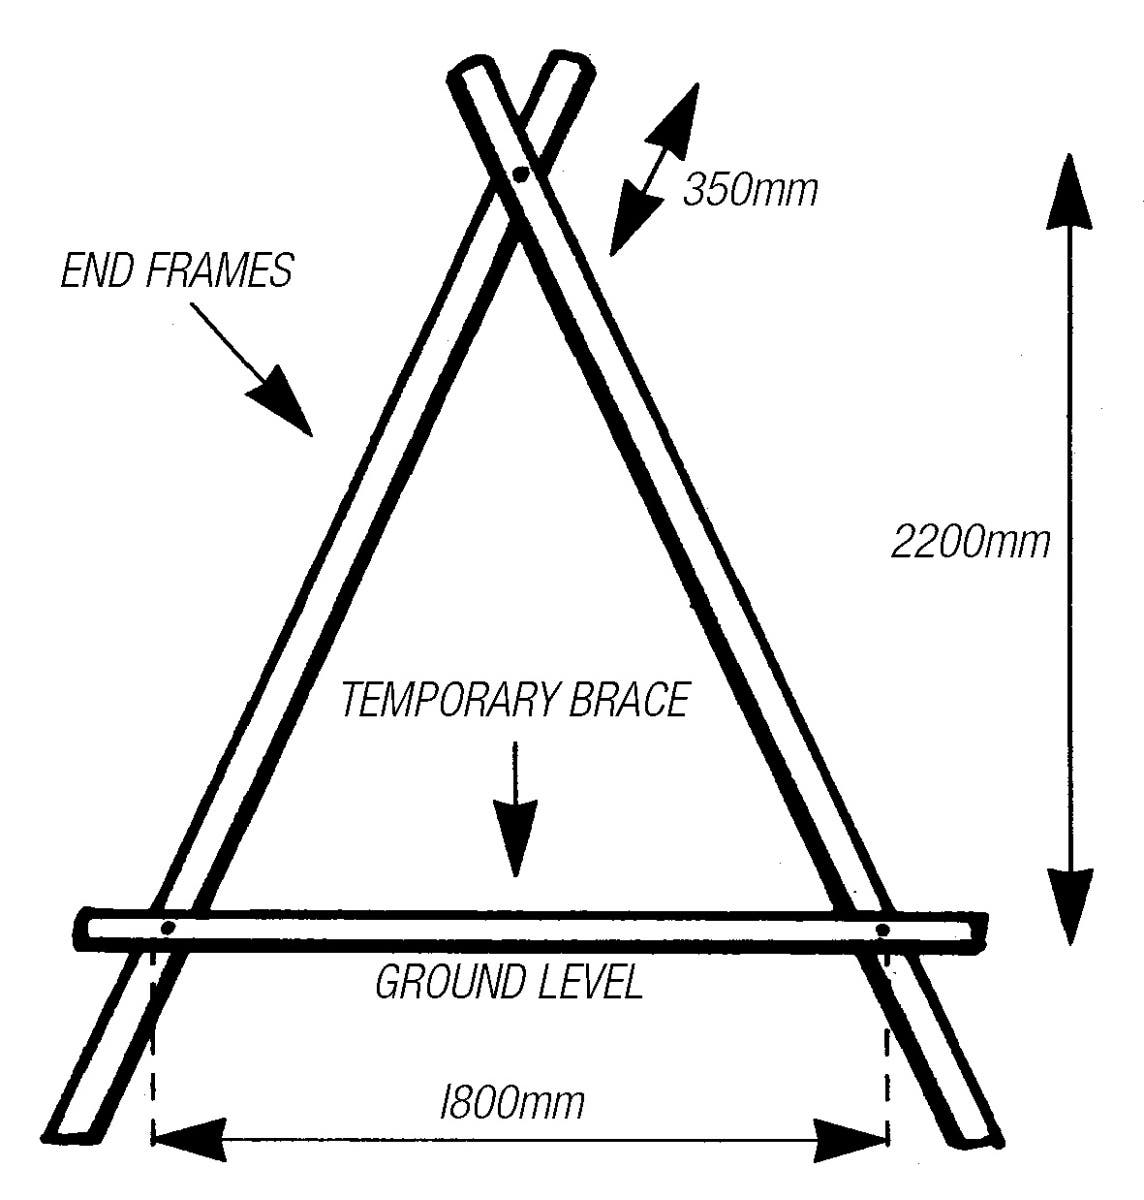
Step 2: Assemble end frames
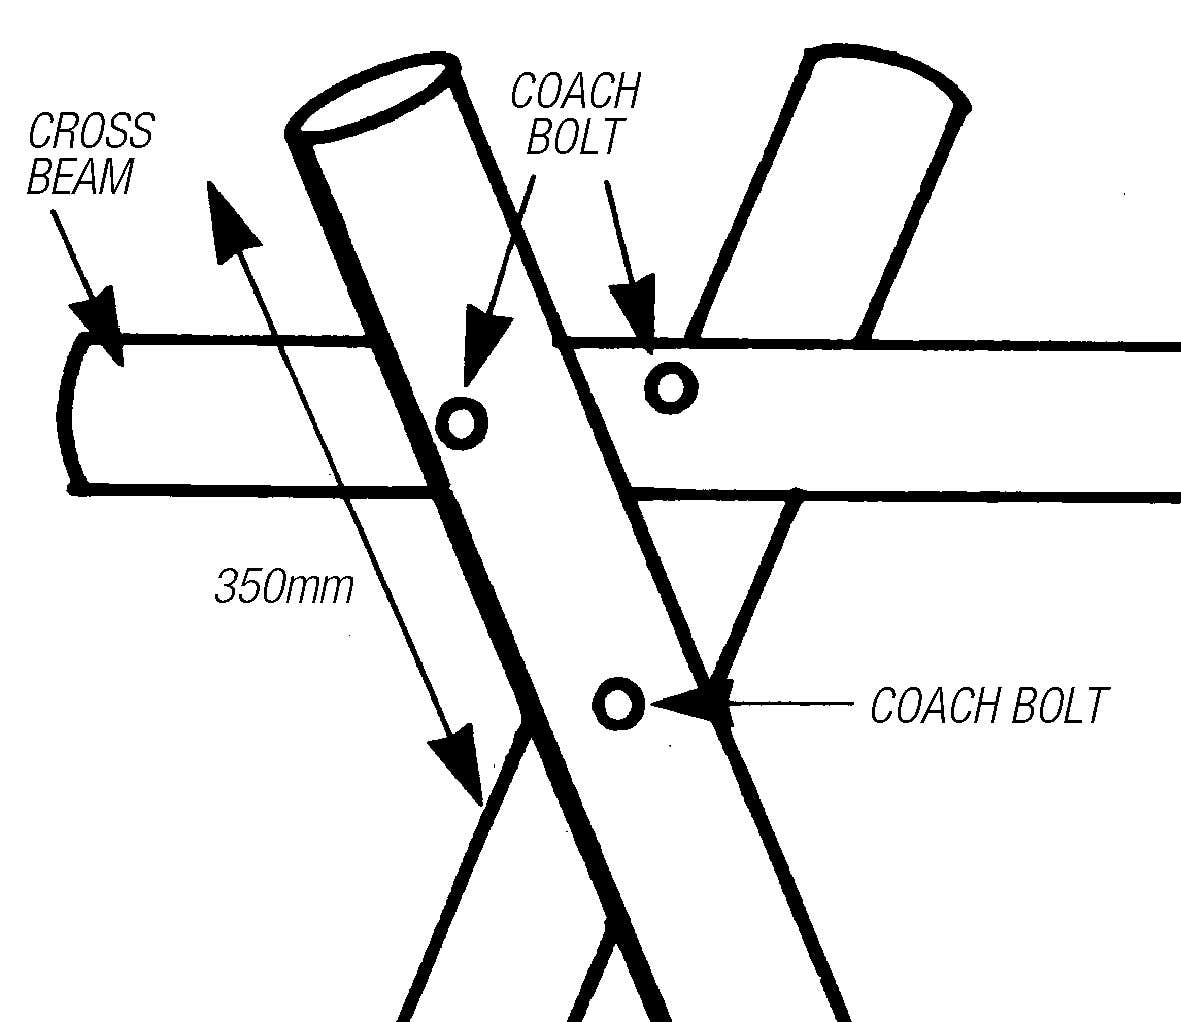
Measure 350mm down from the top of the four remaining 100-125 x 3000mm logs. Drill a 10mm hole through the centre of each log at this point. Join two logs together with a 275 x 10mm coach bolt, washer and nut, but finger tighten only. Next, spread the legs apart at the bottom to 1800mm wide (Fig. 4). Measure 2200mm down from the join and temporarily nail a timber brace to the legs at this point. This represents ground level when erected. Finally, tighten the nuts firmly. Do the same for the opposite end frame
Fig. 4
Step 3: Dig holes
First, lay the centre beam on the ground where the play centre is to be erected. Then, where each end frame is marked on your cross beam, measure out 900mm on each side of the beam on the ground and mark the locations. Dig two holes 300 x 300 x 450mm deep and angled outwards to suit the angle of the end frame legs. Remember that the end frame legs are not parallel to each other, so holes will need to be off-set by 100-125mm, the thickness of the logs.
Stand the assembled end frames upright in the holes. Check with your spirit level that they are plumb, then temporarily brace in position with battens nailed to each side. Make sure that the temporary brace, as in Fig. 4, sits level on the ground, ensuring the correct height for the crossbeam. Place the crossbeam over the end frames. Make sure the end frames correspond to the markings made on the crossbeams in Step 1. Then drill a 10mm hole through one end frame log into the crossbeam, push a 275 x 10mm coach bolt through, fit a washer and nut, and finger tighten only at this stage (Fig. 5). Should the bolt be too short for the combined thickness of the two logs, use a hammer and chisel on the inside of one log to reduce the width. Re-check the level, plumb and general positioning of the erected play centre, adjusting and temporarily bracing as necessary. Repeat the procedure to bolt the adjoining end frame log to the crossbeam (Fig. 5). Then fill the holes with concrete to 150mm below ground level to accommodate the pine bark surface. Leave the concrete to set for 24 hours before tightening the bolts holding the crossbeam to the end frames and checking all other bolts for tightness. Cut off excess bolt ends with a hacksaw and burr over with a hammer. Remove the temporary bracing from the end frame legs, and ensure that all nails used in the bracing are removed from the play area. Finally, for builders of the ‘Swing Centre’ and ‘Swing ‘n’ Ladder Centre’, hang your playground equipment on the pigtail hooks and watch your children enjoy your handiwork.
Fig. 4
Fig. 5
Step 5: Add a platform
(Swing ‘n’ Climb Centre Only).
First, cut the 75-100mm logs into six 1200mm climbing rails. Clamp a climbing rail 300mm above ground level to the outside of both end frames. Drill a 10mm hole through the centre of the climbing rail and end frame legs, fit 250 x 10mm coach bolts, washers and nuts, and tighten firmly. For safety, ensure bolt heads are on the outside surface of the rails, and the nuts and washers are on the inside of the frame. Add a second climbing rail 400mm above the first in the same way, and a top climbing rail 400mm above that, but on the inside of the end frame legs. For the platform, measure and cut the 150 x 25mm boards to size, allowing for a 30mm overhang from the front of the climbing rails on both sides. Nail to the climbing rails with two 75mm galvanised bullet head nails at each end. Finally, hang a swing and trapeze to the pigtail hooks.
Sand Pit
1. Choose a firm, level, well-drained site and mark out the area, approximately 1950mm square. Dig a 30mm deep channel for the bottom log of each wall.
2. To make the four walls, lay out logs in pairs, with the end of the top log overhanging the bottom log at one end by 150mm (Fig. 6). Measure and mark in 300mm on the top log at the overhanging end (approximately 150mm on the set back bottom log), and 150mm from the other end of each top log. Drill a 10 mm vertical hole through both logs at these points. Due to the combined thickness of the two logs, the width of the bottom log may need to be reduced around the bottom of the holes with a hammer and chisel to allow the bolt to fit. Fix together with 300 x 10mm bolts with the washers and nuts on the underside of the wall.
3. Fit the assembled log walls in position as shown (Fig. 6). Drill 10mm holes through the top logs of each wall at the corners and the bottom logs of the connecting walls. Bolt together as before.
4. Line the bottom of the pit with Weed Mat from your Mitre 10 store. This material effectively restricts weed growth while providing good drainage.
5. Now you can add the sand. You may also wish to add a corner seat as indicated, using 150 x 25mm treated pine cut to size and fixed with 75mm galvanised bullet head nails.
Fig. 6