- 21 October 2023
Make your own potting bench in 3 easy steps – with a little help from Mitre 10.
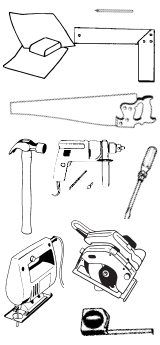
Sooner or later every keen home gardener is going to need a potting bench. Here’s one that you can build in just three easy steps. It’s a sturdy, practical potting bench that organises the clutter of pots and gardening items in your shed or garage. There’s a good-sized workspace with a shelf section above for tools, seeds and small pots. The shelf below holds larger items and there’s even a recessed drop in container for your potting soil. The bench measures about 1480mm long by 650mm deep by 1705mm high so it will fit compactly in any garden. The design we’ve chosen uses treated pine for the lower section, which is ideal for constructions like this. Treated pine is easy to handle, easily cut to size and readily takes paint or stain. The upper shelf section is constructed from radiata pine which we recommend you undercoat before assembly. B y using basic tools like a hammer and saw and following this simple step-by-step plan from Mitre 10, you’ll have it ready for potting use in no time.
Before you start
Making this potting bench will be even easier if you cut all the pieces to size first and then code mark them in pencil as we’ve done in the diagrams here.
Step 1: Construct the frame
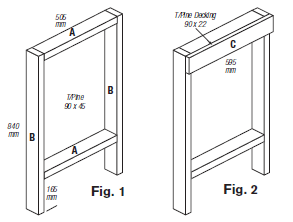
- First cut four horizontal sides (A) from 90 x 45mm treated pine to 505mm lengths.
- Next cut the four vertical sides (B) from 90 x 45mm treated pine to 840mm lengths.
- Finally cut two end trims (C) from 90 x 22 decking to 595mm lengths. Place your sections together so they’re flush and parallel. You might find it easier to do this on a piece of level ground.
- Now drill and screw through the vertical sides (B) into the ends of the upper horizontal sides (A). Use two 8-gauge screws on each of these joins. Do the same thing on the other side and repeat the procedure for the lower horizontal sides (A). The lower brace should be 165mm from the base. Each assembly should look like (Fig 1).
- You then put together the other end frame the same way.
- Before we leave the end frame, there’s one more thing to do. Take the end trims (C) and screw them in place to the outer side of the end frame as per (Fig. 2).
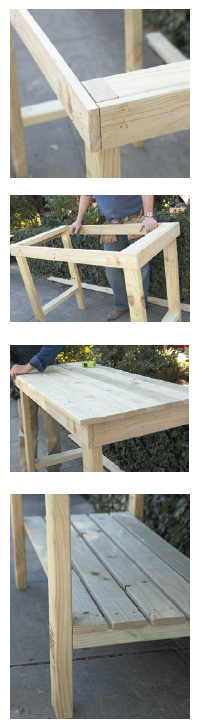
- With your end frames complete, next we’ll add the front and back braces (D) as shown in (Fig. 3).
- First, cut two pieces of 90 x 22mm treated pine to 1380mm lengths.
- Stand your end frames up roughly in position, and with someone holding the brace for you at the other end, screw the front brace (D) into place so that it fits flush with side trim (C). Again, it’s helpful to have someone hold the brace in position for you as you fix the other end in place. Make sure it’s flush and square before screwing in 8-gauge screws.
- Next lay the unit down on the ground to add the back brace (D). Flush and square in position as you’ve done with the front brace. You’ll notice your top frame has an overhang all-round to accommodate the work surface.
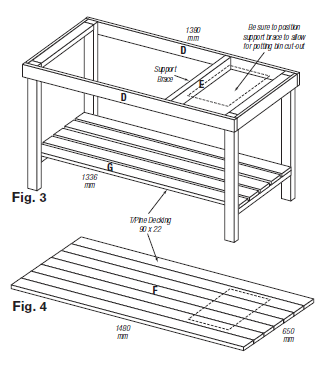
- You will then need to add the support brace (E) for the potting bin. Be sure to position the support brace so as not to interfere with the cut-out for the potting bin as shown (Fig. 3). That’s it! You’ve completed step one.
Step 2: Add the work surface
- First cut seven 90 x 22mm treated pine decking boards each to 1480mm length to form the work surface (F). Lay out these boards on your frame. They should fit flush with the back of the frame and overhang the sides and front of the frame. Place all boards parallel and square with the frame.
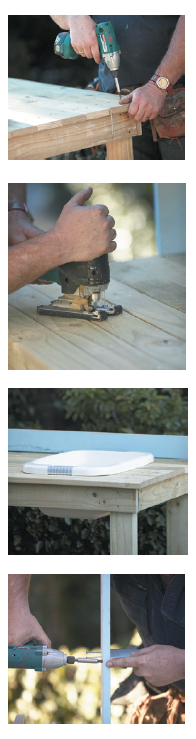
- Now mark and pre-drill all the holes then nail or screw each board into place, including into the support brace for the potting bin, to complete your work surface.
- Next we’ll make the bottom shelf (G). Cut five 90 x 22mm treated pine decking boards to 1336mm lengths. Unlike the work surface, these boards don’t overhang but fit flush within the bench frame as shown in (Fig 3). Allow a gap between each decking board so that they fill the area.
- When everything is parallel, screw or nail them in place. You’ve now got your work surface and bottom shelf in place.
- The next step is to add the potting bin. You can use a heavy duty plastic wash tub available from Mitre 10. First, place your plastic wash tub in an upright position on your work surface and trace a pencil line around where it meets the surface (Fig 4). The lip of the wash tub will ensure that it stays in position once it’s fitted. Be sure to position the wash tub so as the underframe will not interfere with your cut-out.
- Take a jigsaw and cut along the pencil line you’ve drawn.
- Sand the edges to remove any rough edges then simply place your new potting bin through the hole. That completes step two.
Step 3: Make the upper shelf section
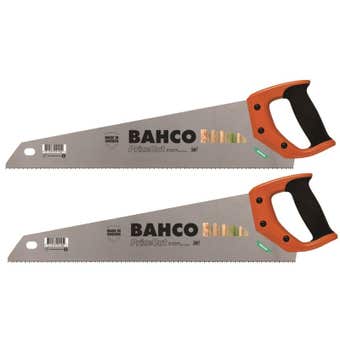
- Cut two shelf sides (H) from 180 x 19mm pine, each measuring 865mm long.
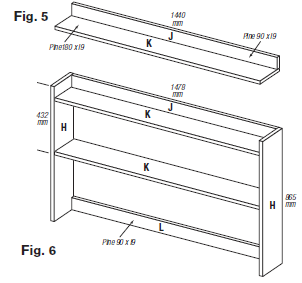
- Then cut one shelf back (J) from 90 x 19mm pine, measuring 1440mm long.
- Finally cut two shelves (K) from 180 x 19mm pine, each measuring 1440mm long.
- Before assembling the upper shelf section be sure to undercoat all pieces, paying particular attention to the end grain of the timber.
- Screw one shelf (K) to the edge of a shelf back (J), making sure that you’ve aligned the bottom edge of the two pieces as shown in (Fig 5). Reinforce the shelf by drilling and screwing 8 gauge screws every 150mm.
- Next place the two shelf sides (H) on a level surface, parallel and 1440mm apart. Take the shelf/back assembly you’ve made in the previous step and fit between the two sides (H) making sure it’s flush with the shelf ends as shown in (Fig 6).
- Use 8 gauge screws to join the shelf/back to the shelf side (H). The middle shelf can then be fixed 432mm down from the top as shown (Fig. 6). Cut one bottom support (L) from 90 x 19 pine, measuring 1440mm long.
- Screw this in position flush with the back and lower ends of the shelf sides (H) as shown in (Fig 6). There you have it – a sturdy and functional potting bench that you’ve made in three easy steps, with a little help from Mitre10.
Add the finishing touch
You may want to leave the potting bench in natural timber. However we think it’s better to give it an exterior stain or paint finish in a colour to complement your home. Ask the paint staff at your local Mitre I0 store for the right product for you.