- 5 February 2021
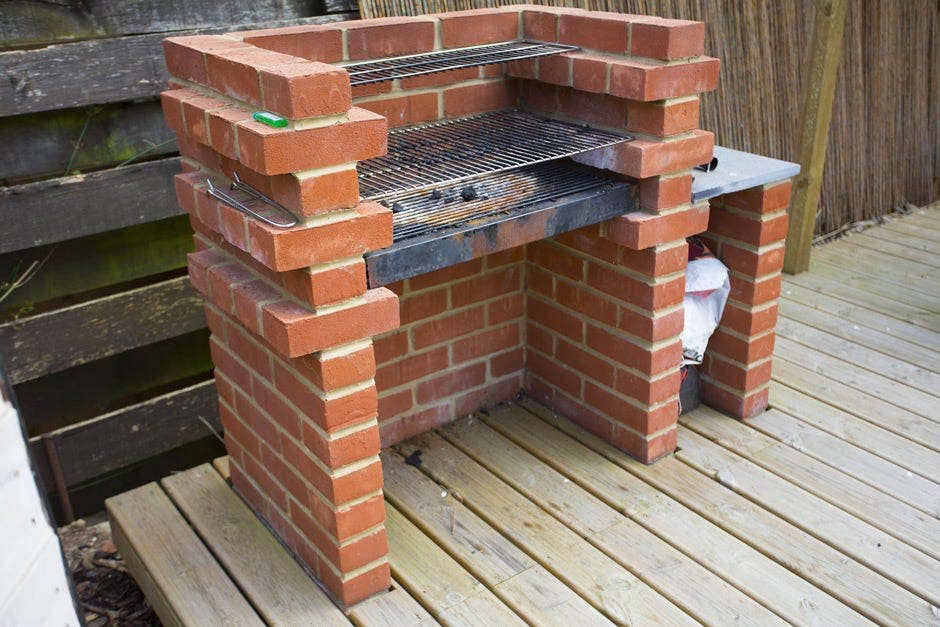
Build your own brick barbeque – with a little help from Mitre 10
Barbequing is the oldest form of cooking - it takes us back to the days when food was cooked over flames on the end of a stick. Today, we do it because we enjoy the company, the smell of sizzling streaks or sausages and the fresh air - and because the backyard barbeque has become part of the aussie way of life. Here's your chance to add a handsome brick barbeque to your garden.
Your Materials Checklist
- Selected Bricks
- Ready-mix Concrete (for foundations)
- Ready-mix Mortar Mortar Board (approx. 1m square for mixing)
- Timber Formwork (100 x 25mm in long lengths)
- F42 Steel Reinforcing Mesh 1350 x 780mm
- 6 – 50mm Bar Chairs (reinforcing supports)
- 20 – 630 x 10mm Steel Rods for fire grate
- Selected Hotplate and/or Grill Timber Work Surface
- 4 – 710 x 90 x 25mm Boards
- 3 – 370 x 50 x 25mm Crosspieces
- 2 – 370 x 25 x 25mm Handles
- 4 – 90 x 25 x 25mm Handle Packing Pieces
Tools for the job
- Long Spirit Level
- Steel Measuring Tape
- Stringline
- Bricklaying Trowel (280–300mm blade)
- Mash Hammer
- Brick Bolster
- Wheelbarrow
- Shovel
- Bucket
- Strong Gloves
- Builder’s Square *
- Gauge Rod *
Step 1: Buying your bricks
This barbecue design is based around standard size clay bricks 230mm long, 110mm wide and 76mm deep with a 10mm mortar joint. You’ll need to buy at least 156 bricks, but as some will need to be cut in half and three-quarter lengths, it’s safer to order extra – say 200 altogether – to allow for mishaps. Be sure that you specify hard, well-burned bricks. Bricks fired (or burned) at a high temperature are more heat resistant than other types and are best for barbeques. Only use clay bricks – never wire cut bricks. And make sure that their appearance will also complement your house and garden.
Mortar: The quickest, easiest way to prepare a mortar mix for a project this size is to use ready-mixed mortar available in 40kg bags. One 40kg bag makes enough mortar to lay 40 to 50 bricks so you’ll need at least four bags. If you’re mixing your own mortar, use the correct mixture – one part cement, one part lime and six parts sand is a good general brickwork mortar.
Step 2: Choose your site
When barbequing, most food is prepared in the kitchen so choose a position close to your house for easy access. Select a wind protected area or at least make sure it’s not too close to the house or you may smoke it out while cooking. Also try to position your barbecue so it won’t carry smoke over your outdoor entertaining area. And ensure that there’s enough room around the fire for free movement, and a place for a table and some benches. If your barbecue is part of a new landscape, plan it so it is integrated with your overall design.
Step 3: Prepare your site
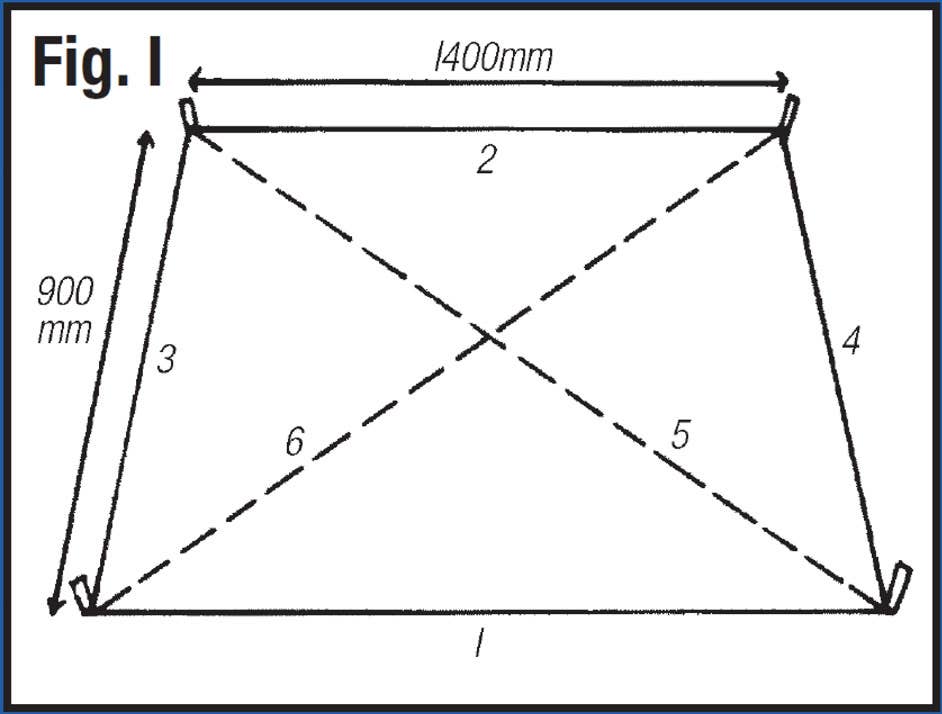
This barbecue will end up five and a half bricks wide, three and a half bricks deep and 10 courses high, so you’ll need a solid concrete slab to build on. First, mark out the area measuring about 1430 x 835mm by driving four corner pegs into the ground and joining with string line (Fig. 1). Lines I and 2 should be equal length, 3 and 4 equal length. Check the distance between the diagonally opposite corners with your measuring tape to make sure that each is the same distance apart (lines 5 and 6). This ensures that the site is both parallel and square. You’ll need to excavate to a depth of around 100mm. Firmly tamp down the bottom if necessary, then box in the area with edging boards and pegs. To prevent the BBQ’s weight or growing tree roots from cracking the concrete slab, place light steel reinforcing mesh in the boxed area supported on the 50mm bar chairs. Mix the ready-mixed concrete, following the directions on the bag and pour it into the boxed area making sure that the reinforcing mesh is completely covered. Use a straight piece of timber to level off the slab (Fig. 2). Cover the concrete with plastic sheeting and leave it to cure for a week. Then remove the edging and backfill the sides.

Step 4: Laying your barbecue
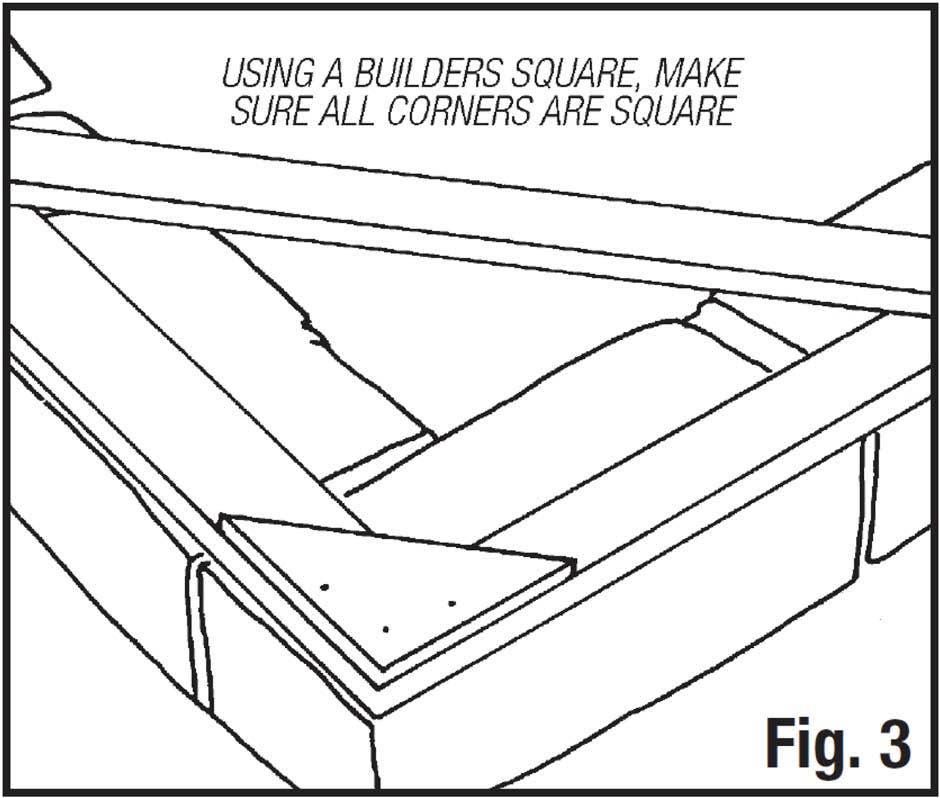
Lay a mock first course without mortar on the concrete slab to get the barbecue’s position right, remembering to allow 10mm gaps between each brick for the mortar. After checking that all corners are square (Fig. 3) with your builder’s square, mark out the position of the bricks with chalk or string line and pegs. Now mix the mortar on a mortarboard according to the instructions on the ready-mixed bag. Mortar is the correct consistency when it sticks to a trowel held almost vertically.
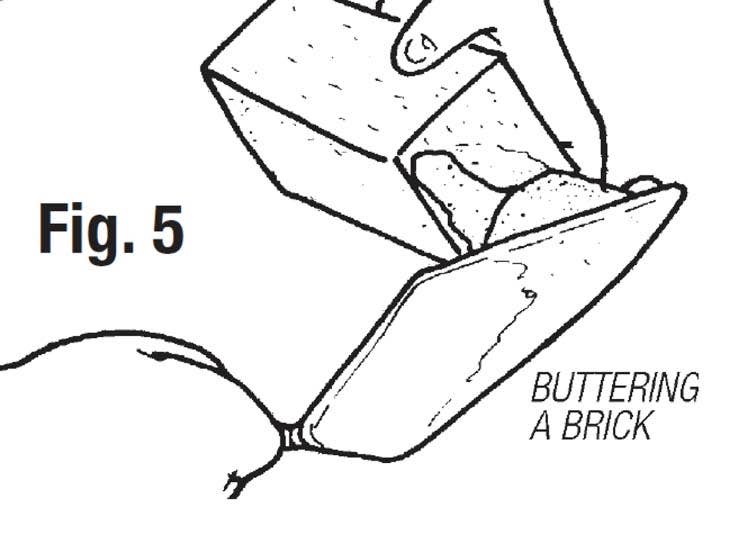
First course: Following Fig. 4, lay the 10mm mortar bed for two or three bricks starting in a corner. Use the tip of your trowel in a stepping action down the middle to spread it out. Place the corner brick in place and tap it down with the trowel handle. Hold the next brick in one hand and scrape on mortar with your trowel across the brick end (Fig. 5). This is known as ‘buttering’. Place the buttered end against the first brick to form a vertical join 10mm thick and firm down with your trowel handle. As you push the bricks together, a certain amount of mortar will ooze out. To scrape off this excess, hold the trowel at an angle and carefully remove it in a slicing motion. The brickwork should remain clean. Complete the first course, constantly checking with your spirit level that the bricks are truly horizontal.
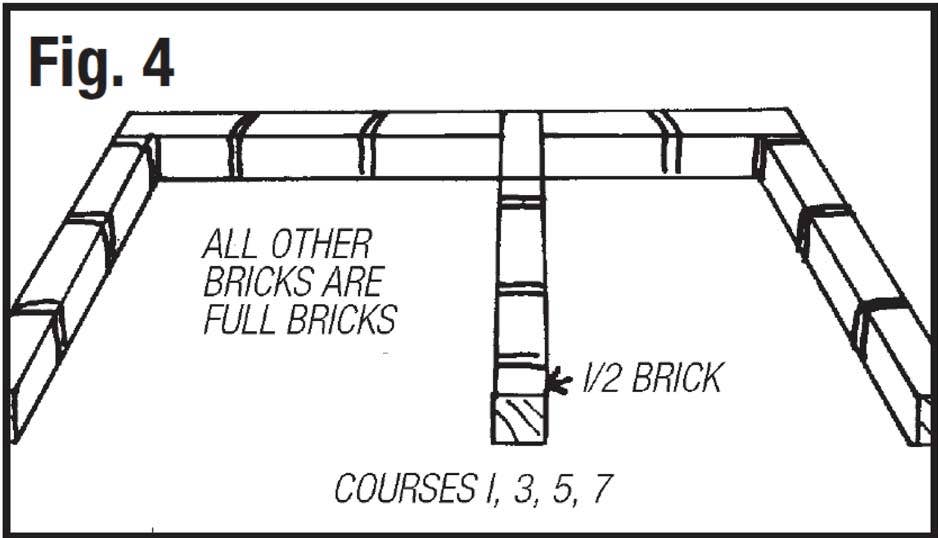
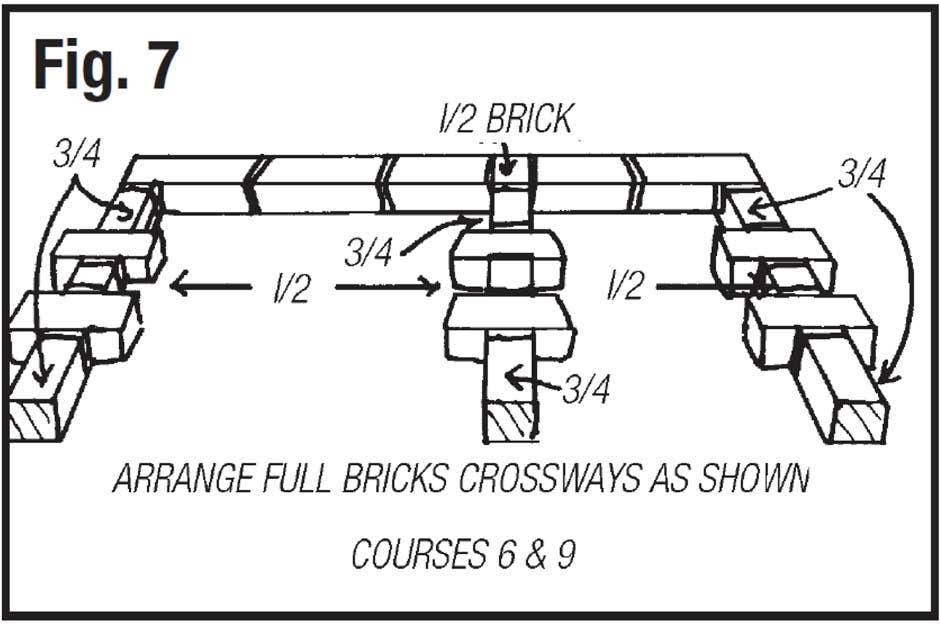
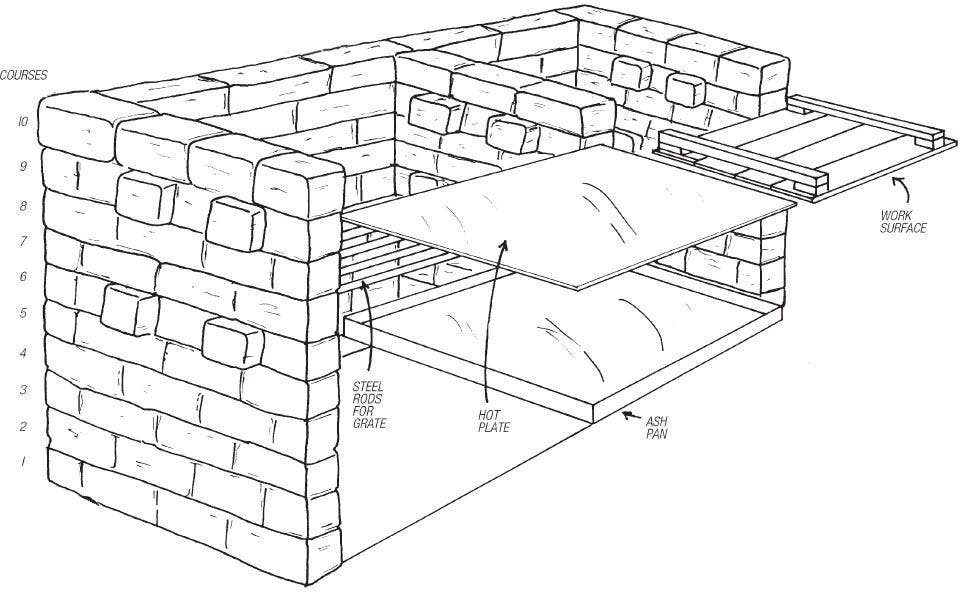
Following courses: Lay the second course to Fig. 6 following the same procedure used for laying the first course. Make sure the bricks are staggered – ie. that the joins in the top bricks never lay over the joins between bricks in the course below. The third course is a repeat of the first (Fig. 4), the fourth is the same as the second (Fig. 6) and so on. Lay the sixth course as shown in Fig. 7. The projecting bricks will support the ash pan. The ash pan is made from galvanised sheet steel cut at the corners and bent 50mm along all edges to form the tray. If you prefer, you can get a metal fabricator to do this for you. The seventh course is a repeat of Fig. 4. The 10mm steel rods forming the fire grate are laid on top of the seventh course. Space them out evenly and lay the eighth course on top of them by following Fig. 6. Lay the ninth course as shown in Fig. 7 with projecting bricks to support your hotplate or grill. Finally, lay the last course as shown in Fig. 6. When completed, leave the mortar to cure for at least two weeks before use, and then only light small fires at first.
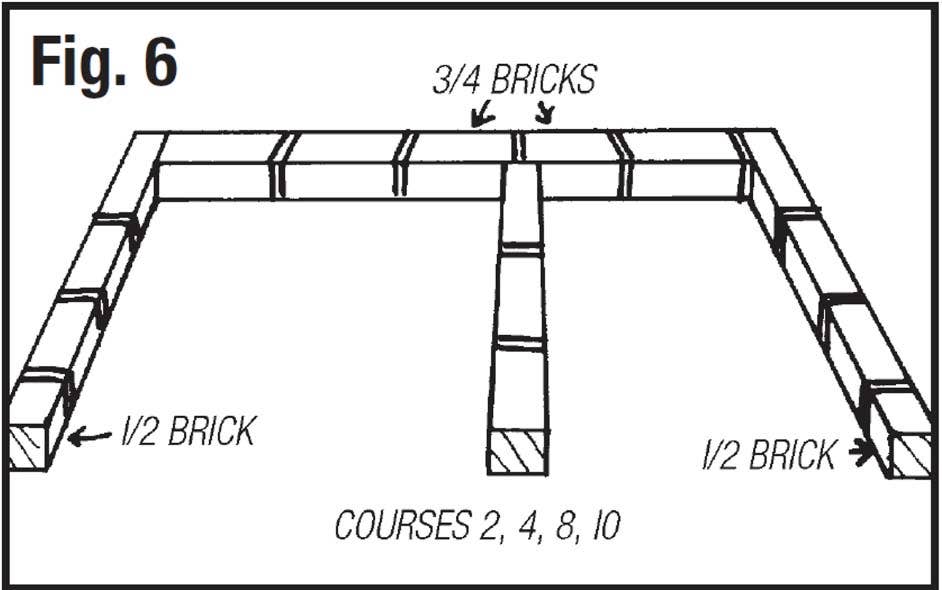
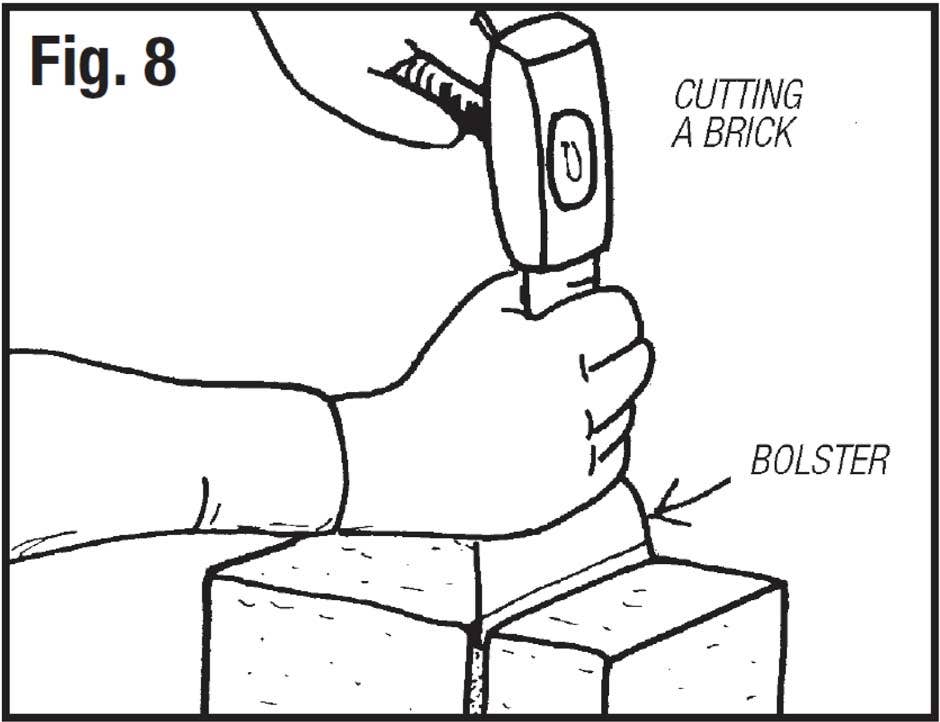
Brick cutting: Courses six and nine (Fig. 7) use half and three-quarter bricks to straddle two on the last course. This means you’ll have to cut the bricks to fit. Mark a cutting line on each face of the brick and nick the line all around with your bolster and mash hammer. Place the brick bottom on grass or sand, put the bolster on the nicked line and firmly hit the bolster with the mash hammer around all faces (not hard enough to fracture the brick). Return to the first surface you hit and give the bolster a sharp blow. The brick should break cleanly along the line (Fig. 8). Alternatively, you can use a power saw or angle grinder fitted with a masonry disc to cut your bricks. Check constantly With each new course, use the gauge rod to check that the bricks are rising to the correct height (Fig. 9). Check constantly with your spirit level that each brick is square as you lay it. You should also check all faces of your brickwork to make sure that your courses are rising perfectly vertically.
Step 5: Making a work surface
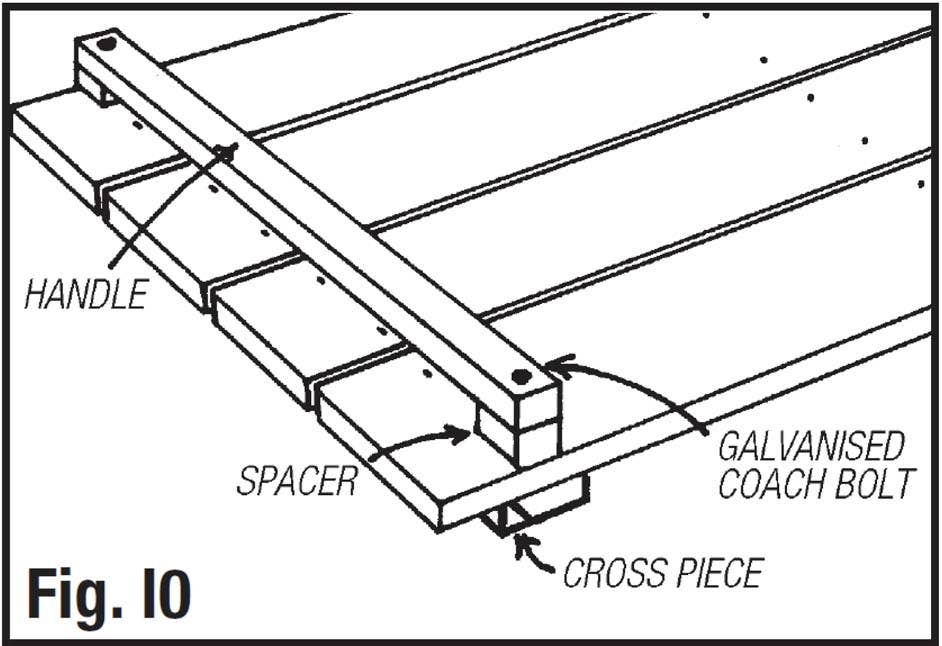
When barbequing, you need an area close to the fire for preparing food and for keeping cooking condiments and tools within easy reach. The convenient timber work surface that rests over the fuel storage area is easy to make (overall size is approximately 710 x 360mm). Add a simple timber handle on top, and it doubles as a handy carrying tray. To make it, cut four 90 x 25mm timber lengths. Use galvanised nails or screws to fix them to three 50 x 25mm crosspieces. Space the boards evenly, allowing small gaps between each for drainage. When buying, be sure to specify durable quality timber. These include most native hardwoods or treated pine. To make the handle, place a 25 x 25mm spacer on each of the two outside boards. On top of these spacers, place a 25 x 25 piece of timber rounded at the edges (Fig. 10). Fix them together using 6mm galvanised coach bolts long enough to extend right through the crosspieces underneath. Then paint or stain to protect it from the weather and to prolong its life.

Step 6: Cleaning up
Clean up the new brickwork no later than two days after laying it. Start at the top and hose off as much mortar as possible. Then scrape it with a wooden scraper using plenty of water to help. For remaining mortar smears, clean with a mixture of 1 part spirits of salts (hydrochloric acid) to 10 parts water – never stronger and even weaker on light coloured bricks. It is important that all masonry surfaces to be cleaned are saturated with water first. Clean only small areas at a time, and hose down well immediately – don’t let the spirits dry on the bricks. Be extremely careful when preparing and using this mixture – spirits of salts can be harmful to your skin and eyes, so wear rubber gloves and safety glasses to avoid splashing it onto your bare skin.
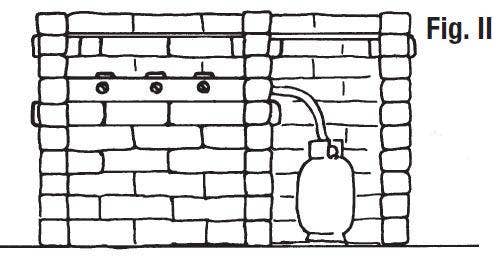
An Alternative design
Wood-fired or L.P. Gas-fired – it’s your choice. A gas fire is of course infinitely easier to control and there is a wide range of models and sizes on the market today. If you opt for gas, the fire opening can easily be bricked in up to the sixth course for a neater appearance. For this, you’ll need another two and a half bricks for each course alternatively laid as in Fig. 11 – a total of 15. The L.P. gas bottle is then housed in the original wood storage area. Remember to leave an opening in the brickwork of the centre wall for the gas bottle hose connection.