


- 20 January 2024
DIY wine rack building guide
Embarking on a DIY journey adds a personal flair to your living space, and what better way to start than with a simple, elegant diamond wooden wine rack cube. Perfect for beginners and seasoned DIYers alike, this guide will take you through the steps to create a beautiful and practical wine rack. Plus, stick around for a trove of additional creative rack ideas to inspire your next project.
Your Materials Checklist
- 1/ 3.6m length of 240 x 19mm radiata pine
- 1/ 1.2m length of 19 x 19mm radiata pine
HARDWARE
- 1 small pack 50 x 2.0mm bullet head nails
- 1 small pack 30mm x 8G wood screws
- 1 small tube of wood stop (putty): colour to match timber or stain
OTHER MATERIALS
- 500ml Wood stain (colour of choice)
- 500ml Clear satin polyurethane
Handy hints to enhace your build
- Nail Holes: Fill them after the first polyurethane coat to prevent staining.
- Wide Boards: Avoid glueing cleats across them to allow natural wood movement and prevent splitting.
- Safety First: Always use protective gear with power tools.
- Timber Variations: Embrace the unique grain and texture of each timber piece.
- Balance and Stability: Stack the rack cubes carefully, considering the weight distribution of the bottles.
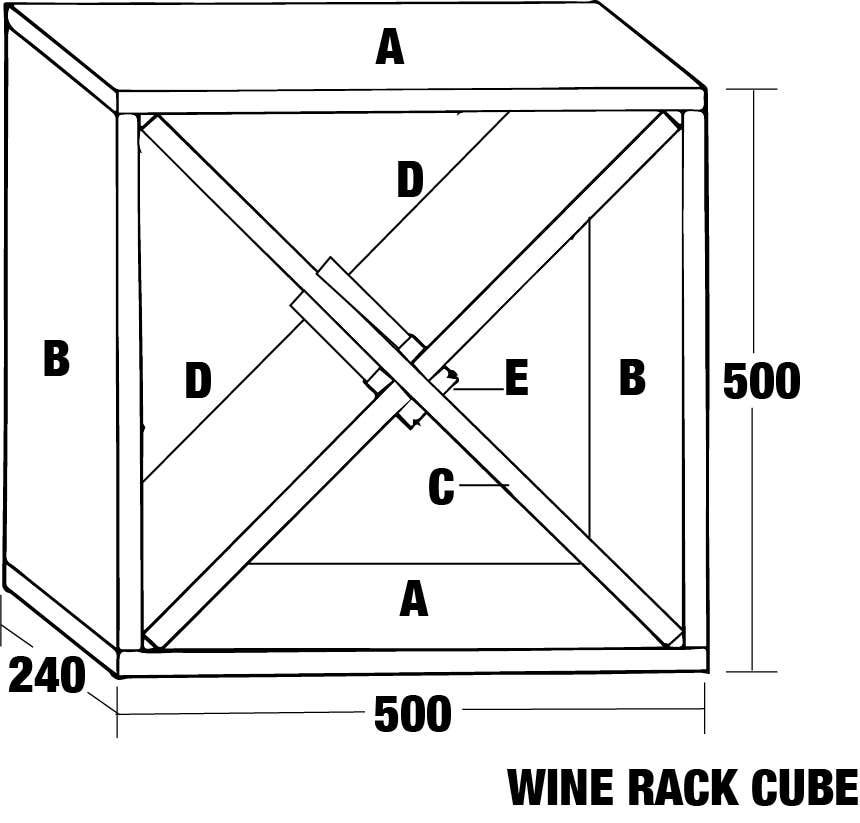
In this MitrePlan we show you how to make a simple wine rack from common timbers. This rack can easily be expanded or reduced in size to fit your available space or accommodate your collection, and you can make any number of cubes and stack them vertically, horizontally, or in steps. Screw the boxes together for stability – you don’t want your valuable wine bottles smashing on the floor! There are no complicated cuts or processes, everything is cut square and may be cut and assembled with hand or power tools. If you wish, you can improve the finish of the wine rack by cutting a double mitre on the dividers (they will also need to be longer) so they fit neatly into the corners. You can eliminate the cleats on the dividers by cutting a halving joint, or by using a router to make a housing joint. Wine bottles are made in many sizes, from slender 60mm diameter bottles to 110mm magnums and even larger. Unlike some types of wine racks, this design will accommodate wine bottles (or any other type of bottle) of any size without the risk of them falling out or getting jammed.
Step 1: Planning your rack
Decide on the number of cubes you want to make, and whether you’ll make it to the size in this plan, or a size to fit a niche in your home. This style of rack can be a freestanding feature, and can also work well in the kitchen – fitted into a wall cupboard or floor cupboard. Other great spots include disused fireplaces, wall niches, wall units, or hanging from a wall. This wine rack looks great made from common, affordable radiata pine, but can be made from any timber you choose – even recycled timber (such as packing-crate timber) for a rustic look that compliments the concept of wine perfectly. Plywood, MDF or particleboard are also suitable, and it may be pre-finished in melamine or painted.
Step 2: Cut and prepare the pieces
Accurately cut all the pieces to length, according to the cutting list. Sand all of the pieces on the faces and edges that will be visible. You can do this by hand (with a block and sandpaper) or by machine with an orbital sander or belt sander. Gently remove sharp edges with your sanding block. Pay special attention to sanding the end-grain of the top and bottom, as these ends will be seen.

Step 3: Assembly
Glue and nail the box together. If you have a vice, hold one of the sides in the vice and apply wood glue (such as PVA) to the end, spreading it evenly with your finger. Nail the bottom to it, flush on the outside face. Hold the other end in the vice and fasten the bottom in the same way. Sit the assembly on your bench, with the ends upright, apply glue and nail the top to the ends. Use a fine nail punch to punch the nails about 2mm below the surface of the timber. Don’t putty the nail holes yet. Lay the box flat on its back and measure the diagonals. If they’re not exactly the same, give the box a squeeze until both diagonals are equal, then leave until the glue sets. Check the fit of the long diagonal divider. It should slip neatly into the box without force. Trim to fit if necessary. Measure to find the centre of the divider’s length. Measure 9.5mm either side of this mark and draw two lines each side to mark the position of the other dividers. Use a try-square to make sure your lines are square and parallel. Screw the cleats along the lines so that the short dividers will slip between the cleats without force. Use three screws in each cleat and do not glue it to the divider. Drill loose clearance holes in the cleats for the screws (see handy hints).
Step 4: Apply a finish
It’s best to apply your chosen finish before assembling the wine rack completely, otherwise the tight corners will be very difficult. Give all the parts a final hand-sand with 280 grit abrasive paper, removing any pencil marks. Apply your chosen stain according to the manufacturer’s instructions and allow it to dry. Apply the first coat of clear polyurethane and allow it to dry. Now apply wood stop to the nail holes and allow it to dry fully. Use 280 grit abrasive paper to flush-off the wood stop and to sand the first coat of polyurethane. Apply a second coat of polyurethane and allow it to dry. If necessary, sand all parts again with 400 grit abrasive paper and apply a final coat of cleat polyurethane.
Step 5: Completing your wine rack
When all of the parts are dry, slide the diagonal dividers into the box. If they are tight you can leave it like this, or you can lock the pieces together with nails driven in the back edges (where they won’t be seen). Now you can stack the cubes and load your new wine rack with your vino of choice.
More DIY wine rack ideas using everyday materials
Circular wine rack
Create a striking display with a circular wine rack. Use a wooden barrel hoop or bend a thin metal strip into a circle. Attach evenly spaced clips or holders for the bottles. This design is a perfect blend of simplicity and elegance, suitable for modern and rustic interiors alike.
Leather wine rack
For a chic and minimalist look, fashion a wine rack using leather straps. Mount the straps on a wooden board or directly on the wall, creating snug loops to hold each bottle. The leather adds warmth and a touch of luxury, ideal for contemporary spaces.
Dual-purpose wooden rack
Combine storage and display by building a wooden rack that holds wine bottles on the top and glasses on the bottom. Use sturdy planks for the structure and add grooves or hooks underneath for the glasses. This practical design saves space and keeps your wine essentials in one place.
Rope and wood wine rack
For a rustic, nautical touch, use thick rope and a sturdy wooden plank. Drill holes in the plank to thread the rope through, creating slings for the bottles. This rack is particularly suited for coastal or country homes.
As you've embarked on this rewarding DIY adventure, creating not just a functional wine rack but also a statement piece for your home, remember that this is only the beginning. The beauty of DIY lies in the endless possibilities and the personal touch you bring to each project. Whether you're looking to tackle another practical home improvement or you're ready to dive into something more ambitious, Mitre 10 is here to support you every step of the way.
Explore our comprehensive DIY section for more inspiration, guidance, and all the tools you'll need to bring your next idea to life.


