- 6 October 2023
How to Build a Timber Workbench
Welcome to a project that combines practicality with a satisfying challenge. Are you eager to create something durable, functional and valuable from scratch? If so, you've found the right guide. Today, we're walking you through the step-by-step process of building your own robust timber workbench.
Our Workbench Design
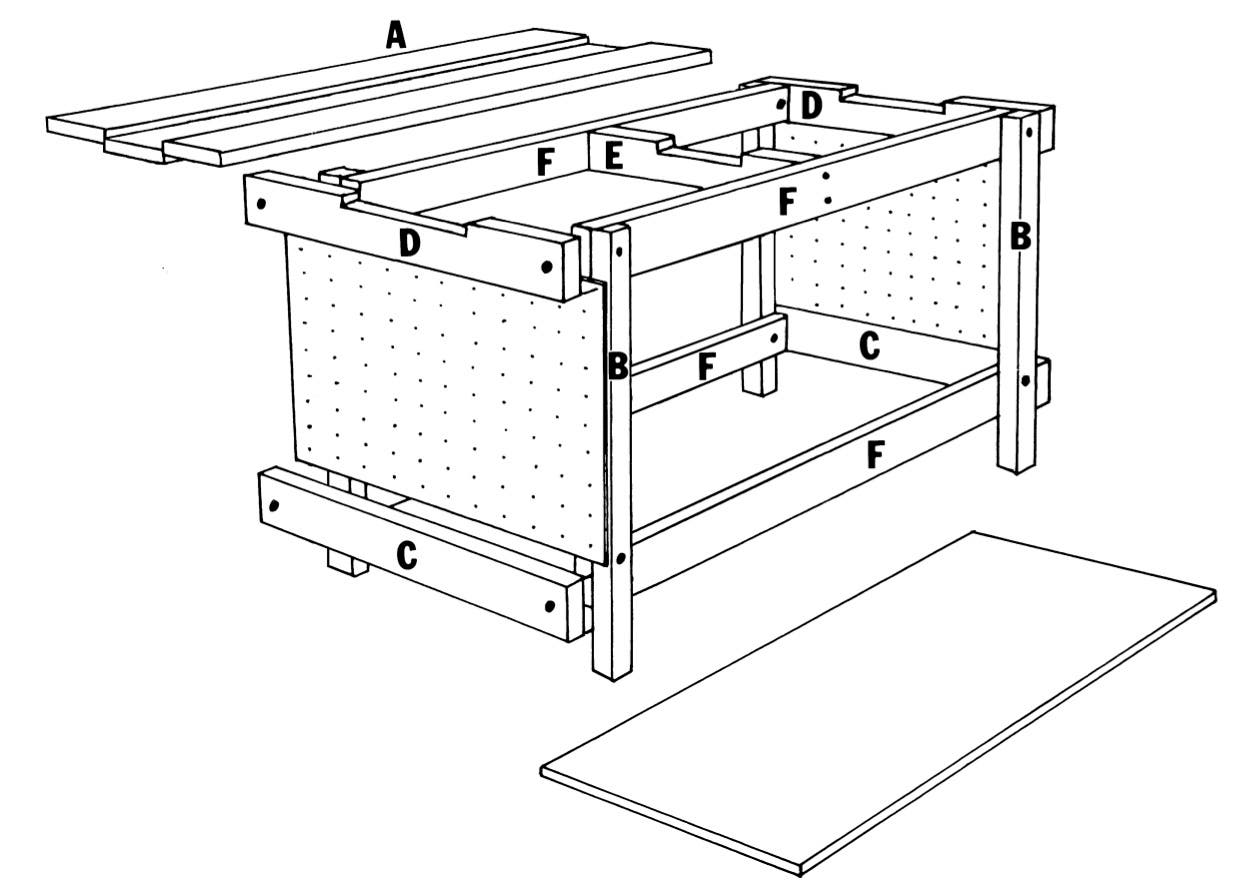
Our chosen design is solid, functional, and crafted entirely from timber. It measures 1800 x 720mm, but feel free to adjust these dimensions to suit your space.
This bench features a full-length bottom shelf for storing larger tools and materials, while smaller tools can be hung on the pegboard ends. The benchtop includes a central channel, also known as a carpenter's well, which makes cutting jobs easier and keeps tools from tumbling off.
What You’ll Need
Materials Checklist
Materials checklist
-
'A' planks – 3 pieces, each 240 x 45 x 1800mm
-
'B' legs – 4 pieces, each 70 x 70 x 810mm
-
'C' & 'D' cross members – 4 pieces, each 90 x 45 x 700mm
-
'E' cross member – 1 piece, 90 x 45 x 470mm
-
'F' cross rails – 4 pieces, each 90 x 45 x 1500mm
-
9mm dowel – 1 piece, 300mm long
Sheet Material
-
12mm particle board – 1 sheet, 1500 x 560mm
-
Pegboard – 2 sheets, each cut to 530mm x 700mm
Fastening Material
-
125 x 10mm coach bolts – 16 pieces
-
25mm flat head nails – 1 packet
-
50 x 2.8mm flat head nails – 1 packet
-
75mm steel wood screws – 1 packet
DIY Project Steps
1. Prepare Your Materials
Let's kick things off by preparing all the components. Mark them as per the codes mentioned below:
- 'A' planks – 3 pieces, each 240 x 45 x 1800mm
- 'B' legs – 4 pieces, each 70 x 70 x 810mm
- 'C' & 'D' cross members – 4 pieces, each 90 x 45 x 700mm
- 'E' cross member – 1 piece, 90 x 45 x 470mm
- 'F' cross rails – 4 pieces, each 90 x 45 x 1500mm
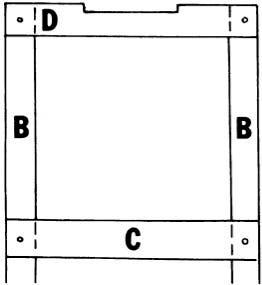
2. Drill Pieces 'C' & 'D'
These pieces will be the top and bottom crossmembers of the bench ends. Drill 10mm centred holes, 35mm from each end.
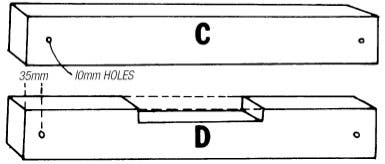
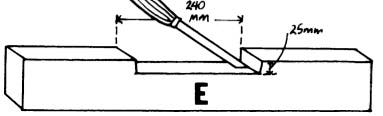
3. Recess Pieces 'D' & 'E'
Create a 240 x 25mm recess in the middle of the three top crossmembers. This will provide a snug fit for the middle top bench plank, marked 'A'.
4. Assemble End Frames'E'
Lay the legs, coded 'B', down first, followed by the cross members. Ensure the recessed 'D' member is flush with the top and outside edges of the legs. Repeat this process for cross member 'C'. After marking the holes, drill through the legs and loosely bolt all pieces together.
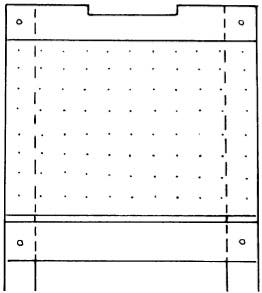
5. Attach the Pegboard
Using flat head nails, attach the pegboard to the legs of each frame. Now you’ve got a handy place to store small hand tools.
6. Connect Crossrails 'F'
Place the cross rails, coded 'F', onto the inside of the legs, lining them up with cross members 'D' and 'C'. Bolt these to the end frame.
7. Position Floorsheet
Slide the floor sheet into position on the bottom rails. Ensure the frame is square before nailing the floor to the rails. Then tighten the rail bolts.
8. Install Crosspiece 'E'
The centre bench support, coded 'E', fits between the top cross rails. Make sure it's centred carefully on top of the rails, and secure it using two wood screws per join.

9. Install the Bench Top
Place your first bench plank, coded ‘A’, into the three recessed top crossmembers. Ensure the overhang is equal at both ends. Screw in the centre plank and repeat for the two outside planks.

10. The Finishing Touches
Fill in the countersunk holes on the benchtop with the 9mm dowel cut to length. Check that all bolts are tight. Now you should consider whether you want to stain, oil, or paint the timber for protection and aesthetics.

Advanced Step: Enhance Your Workbench’s Functionality
Now that you’ve finished building your bench, add a good quality vice to make every building and repair job easier. A vice holds longer pieces of timber or metal, either horizontally or vertically, and provides you with unlimited holding power.
The type of vice you fit depends on what you will mainly use it for. If it’s woodworking, fit a quick-action carpenter’s vice to the front edge of the bench. But if you plan to do mostly metal work or mechanical repairs, an engineer’s vice mounted on top should probably be your choice. Of course, there’s nothing stopping you from adding both for even greater usefulness.