- 12 March 2021
Lay your own paving
Lay your own paving and you’ll enjoy the benefits each time you’re out in the garden.
It’s not a difficult job, so put aside a weekend and you’ll soon be entertaining friends, or enjoying a well-earned rest on your new patio surrounded by pots and plants.
Try one of these brick patterns
- Stetcher
- Basketweave (3 bricks)
- Basketweave (2 bricks)
- Herringbone
- Ribbon
- Checkerboard
Your materials checklist
Tools for the job
- Shovel
- Rake
- String Line
- String Line Level
- Spirit Level
- Tape Measure
- Rubber Mallet
- Mash Hammer
- Brick Bolster
- Trowel
- Hair Broom (not straw)
- Vibrating Compacter (not essential)
Step 1: Planning is essential
Time spent doing a bit of advanced planning before you choose your paving material or start any work can result in a more economical use of material and less effort on your part.
Plan its size – so you can determine quantities and not pay for more materials than you need.
Survey the site – where water persistently lies during or after rain, you may need to put in agi-pipe or strip drain before paving.
Plan the levels – if it’s a patio or path and the surface joins the house, allow a gentle fall away for drainage (see Step 2). The paving must also be a least 150mm below the dampproof course. This is a horizontal layer of material, usually black, fixed in the brick wall about 3 or 4 courses above ground level. If you pave above the 150mm level, you may end up with a serious problem of rising damp.
Plan its use – must it stand up to light or heavy traffic? Clay pavers in either 50mm and 65mm thicknesses are available for domestic use. 50mm pavers are suitable for garden paths and patios, but use 65mm thick pavers for a driveway.
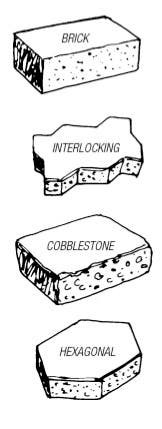
Choose your pavers – normal rectangular bricks remain one of the most popular but brick manufacturers have come up with a range of natural clay pavers specifically made for the job. Today you can choose from square, hexagonal and interlocking design (Fig.1). Not all Mitre 10 stores stock pavers.
Plan your design – stretcher bond, herringbone, parquet, basket weave – you have a variety of interesting patterns to add charm and interest to your property. Check the brick or pavers manufacturer’s brochures for others, or ask at your Mitre 10 store.
Fig. 1
Step 2: Preparing your site
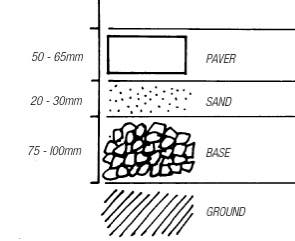
Mark out the four corner boundaries with the stakes. Run string line between the stakes at the level you want the paving to be when completed. Level the string using a string line level or spirit level (Fig. 2). Then adjust the string to allow a small slope of 25mm in 3 metres for water run-off. Remember to slope away from the house. Now you’re ready to start removing the grass and topsoil to a depth that will accommodate a base of finely crushed rock, a bed of sand plus the thickness of the pavers you’ve chosen (Fig. 2A). Make sure the prepared ground is firm and level. Any soft spots should be dug out and filled with extra rubble or crushed rock and then well compacted to stop your paved area from continually sinking. Consider hiring a mechanical plate vibrator to ensure it’s compacted properly. Next, fit timber formwork around the boundaries, driving in stakes behind the boards about 1 metre apart and holding the boards to them with wire or string (Fig. 3). The tops of the boards should be level to act as a guide for levelling the paving surface. Finally, spread a layer of finely crushed rock over the prepared ground, making sure it is well compacted. The compacted thickness of rock should be at least 75mm for paths and other light-duty areas, and 100mm for driveways.
Fig. 2
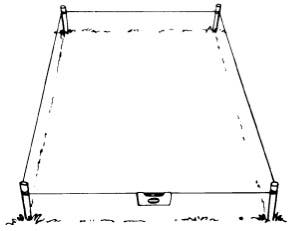
Fig. 2a
Step 3: Spreading the sand
With your garden rake, spread an even layer of sand 20-30mm deep over the base layer of fine crushed rock. Be sure you order the correct type of sand. Beach or fine sand is not suitable. It should be medium river sand or sharp sand suitable for concrete and laid damp – neither too wet or too dry. Now smooth the sand to a uniform level by screeding, running a screed board over the sand along the formwork edges. This is a straight-edged board a little longer than the width of the area you’re paving (Fig. 3,4). To make one, simply notch out each end of the board so that the centre fits within the formwork and projects downward 10mm less than the thickness of your paver to allow for compacting (Fig. 4). If it’s a small path, you can screed it yourself. But if it’s a large patio you’re paving, you may need a helper to draw the screed board along the edges. To save labour, screed up to 3 metres only at a time. If you screed the whole area in advance you will probably end up walking on it before the pavers are laid and having to re-do it.
Fig. 3
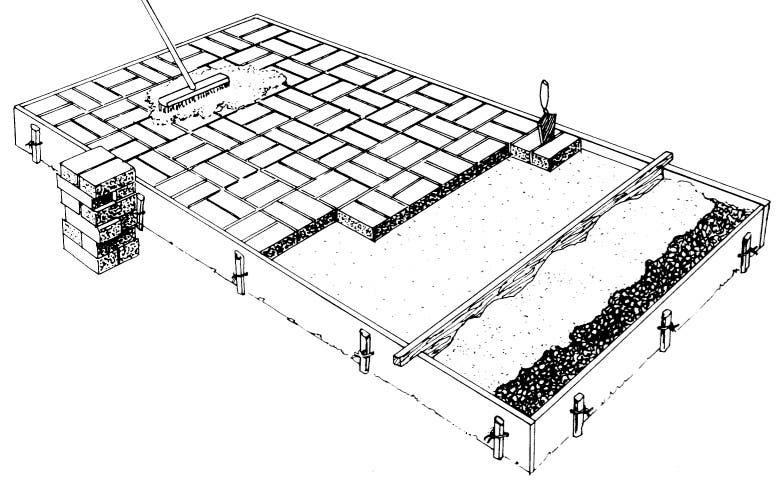
Fig. 4

Step 4: Laying the pavers
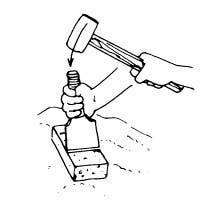
Begin your pattern from a convenient corner, working from outside the sanded area. If it’s on a slope, start from the bottom and work up. Place your pavers on the sand bed flush with each other allowing a 2-4mm gap between each. Gapping is important – it allows for the joint material, interlocking and any minor variation in the size of the pavers. The gaps are later filled with sand to help spread the load between the pavers. Use a trowel to move pavers into position (Fig. 5). Continue laying in this manner until you’ve completed a square metre or so. Then tamp the pavers level with each other by using a rubber mallet and a piece of timber long enough to cover a number of pavers at a time (Fig. 6). It is best to work through a full 360 degrees, checking constantly with a spirit level that the desired surface level is being maintained in all directions. For large areas over 25sq. metres, it may be worth hiring a mechanical plate vibrator to settle the pavers. It’s a good idea to attach an old piece of carpet to the bottom of the plate to protect your pavers. If it becomes necessary to walk on the newly-laid paving, first place planks or a large sheet of plywood to spread your weight. For cutting pavers to fit edgings or corners, use a mash hammer and bolster to first form a groove on both sides of the paver and then complete the cut with a sharp blow (Fig. 7). If there’s a lot of cutting needed, you’d be better off hiring a paver splitter or brick saw with diamond blade. Where the work involved will take more than a day, tamp to within
1 metre of the edge to prevent rain washing away too much of the sand, or the pavers spreading and losing their level bedding. Finally, when all the pavers are laid and tamped, use fine dry sand to fill the gaps between pavers. Spread it over the whole area and sweep into the cracks. Repeat this until all the gaps are filled and then retamp the surface again making any minor adjustments to individual pavers with the handle of a hammer or trowel. Brush off any excess and play a fine spray of water over the surface – but not too much water or the mixture will overflow the cracks and get washed away.
Fig. 5
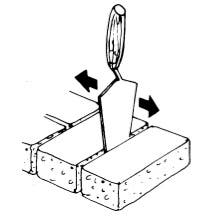
Fig. 6
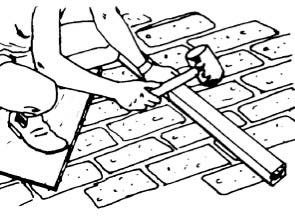
Fig. 8
Step 5: Finishing off
When the job is all but completed, there is one final step. Some form of fixed border is needed to stop your pavers moving and spreading out when walked over, perhaps causing the surface to sink or dip. There are several ways you can do this. You can leave the wooden formwork where it is, especially if you used treated pine or hardwood. Another way is to remove the formwork and lay extra pavers on end to form a decorative edge. Or, you can run a hidden concrete edge along the outside row of pavers and just below the surface, then fill with earth, and grow grass right up to the pavement.